2026 · Novus VisualizersAbout 14 min readNovus Stream Solutions
From one track to vertical shorts, Canvas loops, and lyric videos
One song usually needs three videos: a vertical short, a looping Spotify Canvas, and a lyric video. Here is how to build the visual once in Novus Visualizers and reframe it for each destination instead of rebuilding it three times.
Reviewed and updated August 1, 2026. Re-checked against the Novus Visualizers V3 catalog on August 1, 2026. The app now ships ten engines with six modes each, sixty modes in total, so the counts, the engine list, and the mode arithmetic in this article have been corrected. The Logo engine landed after this piece was first published.
Contents
- 1.Overview
- 2.One project, three shapes
- 3.Building the master scene once
- 4.The deterministic renderer is what makes reframing safe
- 5.Deliverable one: the vertical short
- 6.Composing for the vertical safe zone
- 7.Deliverable two: the Spotify Canvas loop
- 8.Making the loop seamless
- 9.Deliverable three: the lyric video with on-device captions
- 10.Reframing captions across aspect ratios
- 11.Exporting each cut without budgeting renders
- 12.A repeatable release ritual
Overview
A finished song rarely goes to one place. The same three minutes of audio has to become a vertical short for TikTok, Reels, and Shorts, a looping Spotify Canvas that plays behind the track inside the app, and a lyric video that lives on YouTube for the people who want to read along. The reflexive way to make those three things is to build three projects, which means analyzing the audio three times, rebuilding the look three times, and hoping the results feel like one release rather than three unrelated clips. Novus Visualizers is built for the opposite habit: make the visual once, then reframe it for each destination. This post walks a single project through all three cuts.
Reframing rather than rebuilding is not a slogan; it is a property of how the tool is put together. Two editors (the guided Classic Editor and the node-based Studio Workstation) write to one saved document, and one deterministic renderer turns that document into pixels, so the preview you judge is the frame you export. Because the scene is defined once and rendered predictably, changing the shape of the output does not mean starting over. You keep the engine, the colors, the audio bindings, and the layers, and you only change the frame around them. The work that follows is composition and timing for each platform, not three separate builds of the same idea from a blank canvas.
One project, three shapes
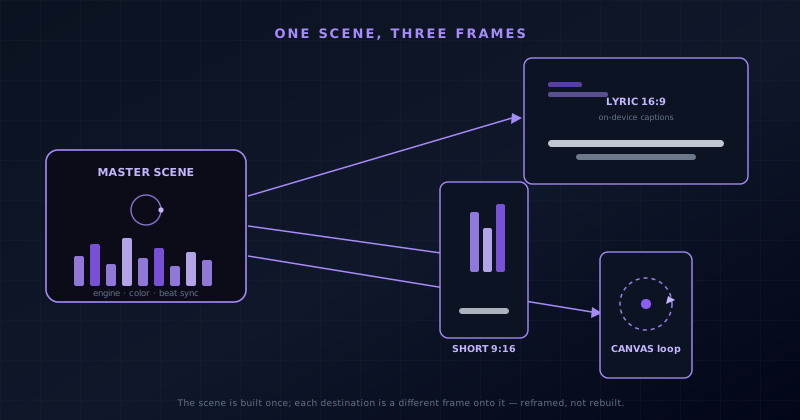
Start by separating two things that usually get tangled: the scene and the frame. The scene is everything that makes the visual yours: the engine and mode driving the motion, the color and geometry choices, the logo, the captions, and the way bass, mid, and treble are wired to different elements. The frame is the rectangle you view that scene through: its aspect ratio, its resolution, and which part of the composition sits inside the safe area. A vertical short, a Spotify Canvas, and a lyric video are three different frames onto the same scene. Once you think of them that way, the release stops being three projects and becomes one project seen through three windows.
The payoff is consistency without repetition. A viewer who sees your Canvas in Spotify and then your short on TikTok should feel they are looking at the same release, and that coherence is automatic when both cuts share a scene rather than being rebuilt from memory. It also means a change of mind propagates cleanly: adjust the palette or swap the engine mode on the master, and every cut inherits the new look the next time you frame and export it. The alternative (three hand-built projects that drift apart with every edit) is exactly the fragmentation this workflow avoids. One scene, framed deliberately for each place it will live, is the whole method.
Building the master scene once
Everything begins in the editor at visualizers.novusstreamsolutions.com/editor with the track itself. Upload the audio and the analyzer reads it on your device (a 32-band FFT for the spectrum, plus BPM and onset detection for the rhythm), so the motion follows the actual song rather than a generic loop. From there you pick one of the ten engines and one of its six modes, which is the single biggest decision about how the visual feels: a Bars engine reads as a clean equalizer, a Bloom engine grows organic shapes, a Tunnel engine pulls the viewer forward through the mix. There is no template gallery to browse and no preset scene to inherit; you choose an engine and a mode and shape them, which keeps the look yours rather than a recognizable stock style.
With the engine chosen, the master scene gets its identity. You tune colors and geometry, set the direction of the motion, and decide which slice of the spectrum drives which element, grounding heavy shapes on the bass while the treble catches the detail. You add the pieces that carry the release across every cut: a logo, an overlay, and the captions if the song has words. Because layers are ordered with no fixed maximum, you can stack as many elements as the composition needs and reorder them freely. This master is what you will frame three ways, so it is worth building generously, with a little more going on than any single cut strictly requires, so that each frame has enough scene to crop into.
The deterministic renderer is what makes reframing safe
The reason reframing works at all is that the renderer is deterministic: the same document produces the same frames every time, at any resolution, aspect ratio, or frame rate you ask for. That is the technical guarantee behind the promise that preview matches export. When you change the canvas from wide to tall, the engine does not improvise a new look; it renders the identical scene into a differently shaped frame. Nothing about the motion, the color, or the audio reactivity is recomputed differently for vertical versus horizontal. You are only changing the window, and the renderer honors the window without touching the scene behind it.
This matters because it removes the usual anxiety of adapting a design for a new format. In many tools, resizing a project shifts elements unpredictably, re-flows text, or subtly changes the timing, so a horizontal edit that looked right becomes a vertical edit you no longer trust. Here the scene is fixed and only the frame moves, so what you verified in the preview is what lands in the file. That reliability is what lets you treat the three deliverables as reframes rather than rebuilds: you can reposition a layer for a vertical crop and know the rest of the composition stays exactly where you left it, because the renderer is not quietly making layout decisions on your behalf.
Deliverable one: the vertical short
The first cut is the 9:16 vertical short, the format TikTok, Reels, and YouTube Shorts all share. Set the output to a vertical aspect and the frame becomes tall and narrow, which changes what the viewer can see of your scene at once. A wide composition that spread its energy horizontally now needs its focal point moved toward the center column, so you reposition the layers that matter into the vertical safe area and let the busier edges fall outside the crop. This is the moment the reframe-not-rebuild idea earns its keep: the engine, the colors, and the beat sync are untouched, and the only work is composing the existing scene for a portrait rectangle.
A vertical short also rewards a slightly more assertive read of the audio, because the format is watched quickly and often muted for the first second. Motion that is unmistakable right away (a strong pulse on the beat, a clear central figure that reacts to the bass) earns the viewer who decides in a heartbeat whether to keep watching. Once the composition is set, choose the vertical platform preset so the export lands at the right dimensions and frame rate, then encode. The result is a release-ready MP4 up to 4K with the track embedded, no watermark, and no export limit, ready to upload without a second tool in the chain to fix the aspect ratio.
Composing for the vertical safe zone
Vertical platforms cover parts of the frame with their own interface: captions, handles, buttons, and the progress bar crowd the bottom and right edges, so a short that ignores those regions ends up with its logo half-hidden behind a share icon. The safe zone is the central band that stays visible across apps, and composing for it is mostly about keeping anything load-bearing away from the extreme edges. Your logo sits high enough to clear the caption stack, your central motion holds the middle, and decorative elements are the only things allowed to bleed into the zones the platform will cover. None of this changes the scene; it changes where you place the scene inside the tall frame.
A short checklist keeps the vertical cut clean without over-thinking it. The point is to make deliberate choices about the few things that matter in portrait, then trust the deterministic renderer to hold them exactly there through export rather than second-guessing what the crop will do.
- Keep the logo and any text clear of the bottom third, where captions and buttons sit.
- Center the element that reacts most strongly to the beat so it survives the narrow crop.
- Let busy background motion run to the edges; it reads as energy even when partly covered.
- Preview at the vertical aspect before exporting, since that preview is exactly the exported frame.
Deliverable two: the Spotify Canvas loop
The second cut is a Spotify Canvas, the short vertical video that loops behind a track inside the Spotify app. Its constraints are different from a short: Canvas is a vertical 9:16 clip only a few seconds long, and it plays on repeat, so the thing that makes or breaks it is whether the loop is seamless. A Canvas that visibly jumps at the loop point is worse than none, because the seam repeats every few seconds and quickly becomes all the viewer can see. The good news is that the scene is already built; a Canvas is a short, carefully looped window onto the same master, exported through the Spotify Canvas platform preset so the dimensions match without you hunting for the spec.
Because a Canvas is so short, it is the cut that leans hardest on the Studio Workstation. The Classic Editor is enough to frame and export a straightforward loop, but tightening a few seconds so they repeat invisibly is timeline work: you want beat and bar markers to find a musically natural loop length, a loop region to define exactly where the clip starts and ends, and keyframes with graph curves to make sure every animated value returns to where it began. That control is what turns a raw few-second slice into a loop that feels intentional rather than truncated, and it is why the Canvas is worth building in the node-based editor even when the short and the lyric video are comfortable in the guided one.
Making the loop seamless
Seamlessness is a property of the first and last frame agreeing. If a particle is drifting left at the start, it must be drifting left in the same place at the end; if a color is mid-transition when the clip begins, it must arrive back at that exact value when the clip loops. The beat-aware timeline makes this tractable because it lets you snap the loop region to bar boundaries, so the loop length is a whole number of musical bars and the rhythm itself lines up across the seam. Onsets and BPM are already detected from the track, so the markers are not guesses: they sit on the actual structure of the song rather than on a grid you eyeballed.
Graph curves are the other half of the craft. A value that ramps upward and never returns will always show a seam, so the fix is either to shape its curve so it ends where it started or to choose motion that is naturally cyclical to begin with. A few habits make Canvas loops reliable enough to ship without staring at the seam.
- Snap the loop region to whole bars so the beat matches across the seam.
- Prefer engines and modes whose motion is inherently cyclical, like orbits and rings.
- Keyframe animated values back to their starting point at the loop boundary.
- Watch the loop play several times in preview; a seam that hides on the first pass shows on the third.
Deliverable three: the lyric video with on-device captions
The third cut is the lyric video, and it is where the captions built into the master finally take center stage. Novus Visualizers can transcribe a song's words with a model that runs on your device, so the audio never leaves the browser to become text, the same privacy posture as the rest of the analysis. The transcription gives you timed captions that you can correct and restyle, which matters because automatic transcription is a strong starting point rather than a finished script, especially for stylized or layered vocals. For a dedicated lyric build, the Lyric Video Creator at visualizers.novusstreamsolutions.com/lyric-videos is the focused surface, sharing the same engines, captions, and export as the main editor.
A lyric video changes the balance of the composition, because now the text is the point and the visual is the setting for it. That usually means dialing the motion back a little so the words stay readable, choosing a caption style with enough contrast against the moving background, and giving the lines room rather than letting them fight the busiest part of the scene. The engine and colors carry over from the master, so the lyric cut still looks like the same release; what changes is the emphasis. The reframe here is as much about hierarchy as aspect ratio: the same scene, recomposed so the reading experience leads and the motion supports it instead of competing with it.
Reframing captions across aspect ratios
Captions are the element most sensitive to reframing, because their position and size have to change with the frame while their content and timing do not. In the vertical short, a caption belongs high in the safe zone so the platform's own text does not collide with it; in the Canvas, captions are often better left off entirely, since a few looping seconds rarely give a full line time to be read; in the lyric video, the captions are the main event and sit where the eye naturally rests. The words and their timings are identical across all three (they came from one transcription), but where and how prominently they appear is a per-frame decision.
This is another place the single-document model pays off. Because the timed captions live in the master, you are not re-transcribing or re-timing for each cut; you are restyling and repositioning text that already knows when to appear. Correct a misheard line once and every cut that shows captions inherits the fix. The discipline is to treat timing as shared and presentation as local: lock the words and their moments early, then let each frame decide how loud the captions should be. That separation keeps three deliverables in sync on the thing that is hardest to redo (accurate, well-timed lyrics) while leaving you free to compose each one differently.
Exporting each cut without budgeting renders
Export is where the three cuts diverge into three files, and the platform presets keep that step from becoming a spec-hunting exercise. Rather than remembering that a short wants one aspect and a Canvas another, you pick the destination and the preset caps the resolution and frame rate to sensible targets for it. Under the hood every export runs the same way: the deterministic renderer produces frames, WebCodecs hands them to the device's hardware encoder, and the result is an MP4 with H.264 or a WebM with VP9, up to 4K at 24, 30, or 60 fps. It all happens in the browser, so nothing uploads and there is no render queue to wait behind.
The economics of that local export are what make a three-cut release painless: every file comes out free of any watermark, and there is no quota counting how many times you export. You can render the short, tweak the Canvas loop, re-export it, decide the lyric captions need one more pass, and export again, without a meter ticking or a paywall appearing at the third render. Because the encode uses the device's own hardware encoder, a typical cut finishes quickly, and the slowest part of the process is your own composition decisions rather than a server working through a line. Three deliverables from one project is a matter of framing and exporting, not rationing renders.
A repeatable release ritual
Put together, the workflow becomes a ritual you can run for every song. Build the master scene once: track, engine and mode, colors, audio bindings, logo, and captions. Then frame it three times: a 9:16 short composed for the vertical safe zone, a seamless Canvas loop tightened on the beat-aware timeline, and a lyric video that puts the transcribed words first. Each cut is a reframe of the same scene, exported through the right platform preset, so the release feels like one coherent thing across every place it appears. What used to be three separate projects collapses into one project and three deliberate compositions.
The companion tools round out the release without breaking the pattern. Cover Art Studio gives you a still that matches the motion, Stream Overlays adapts the same look for a live layout, and the Audio Library and Audio Effects Generator help on the sound side when a track needs something sharper for the analyzer to react to. All of it shares the idea that made the three cuts easy: define the creative work once and adapt it deliberately, rather than rebuilding from scratch for every surface. Start with the master in the editor, and the short, the Canvas, and the lyric video stop being separate jobs and become the natural outputs of a single afternoon.
Frequently asked questions
Quick answers to common questions about this topic.
Can I make a Spotify Canvas and a TikTok short from the same project?
Yes, and that is the intended workflow. You build one master scene, then reframe it (change the aspect ratio and reposition the layers) for each destination and export through that platform preset, rather than rebuilding the visual from scratch for each one.
Do the lyric captions run in the cloud?
No. The transcription that produces timed captions runs on a model on your device, so the audio stays in your browser. The captions come out timed and editable, so you can correct any misheard lines before styling them for the lyric cut.
How do I keep a Spotify Canvas loop from jumping at the seam?
Snap the loop region to whole bars on the beat-aware timeline so the rhythm matches across the seam, and keyframe every animated value back to its starting point at the loop boundary. Motion that is naturally cyclical, like orbits and rings, loops most cleanly.
Is there an export limit or watermark on any of these formats?
No. Every export is client-side via WebCodecs, up to 4K in MP4 (H.264) or WebM (VP9), with no watermark and no quota, so you can render the short, the Canvas, and the lyric video as many times as you need.
Related workflow
A track to a release-ready visualizer, per platform
Render the visual once, then produce the platform masters from it, instead of re-rendering the whole video for every aspect ratio.
- Render the beat-synced videoNovus Visualizers: Pick the engine and mode against your actual track; the analysis is done on your audio, not on a preset preview.
- Trim or upscale the exportNSS Background Remover: The video utilities handle the tidy-up pass so the render does not have to be repeated to fix ten seconds of it.
- Produce the per-platform mastersNovus Convert: Each destination wants a different container and bitrate; converting the finished render is far cheaper than re-rendering it.
Related troubleshooting
Was this page helpful?
Your answer stays in this browser, it is not sent anywhere and no account or cookie is involved.