2026 · Novus VisualizersAbout 15 min readNovus Stream Solutions
Animating parameters with keyframes and graph curves
A single reactive setting treats a whole song as one texture. The Studio timeline lets you keyframe any parameter, shape its motion with graph curves, and anchor changes to beats and bars, so a visualization follows the arc of the music instead of running flat from start to finish.
Contents
- 1.Overview
- 2.One document, two editors, one renderer
- 3.What a keyframe is here
- 4.Graph curves: shaping the motion between keyframes
- 5.Anchoring changes to beat and bar markers
- 6.Keyframes and reactivity are not rivals
- 7.Clips: giving a parameter a start and an end
- 8.Loop regions: motion that repeats with the bars
- 9.A worked example: animating a drop
- 10.Layers, groups, and how animation scopes
- 11.Animating inside depth modes
- 12.Deterministic export closes the loop
Overview
A first pass in Novus Visualizers is usually a single reactive setting. You upload a track, pick an engine and a mode, wire a few audio bindings, and the scene breathes with the music from the first second to the last. That produces a watchable video, but it treats a three-minute song as one continuous texture. Real records are not uniform: an intro is sparse, a verse settles, a chorus fills in, a bridge drops away, and a final chorus doubles down. A setting that never changes cannot express that arc. Animating parameters over time is how you give a visualization structure, so the scene is calm where the music is calm and violent where it detonates, on purpose rather than by accident.
That structure lives in the Studio Workstation timeline. Where the Classic Editor is a guided form for choosing a look once, the Studio treats every property as something that can change across the length of the piece. You keyframe a value at specific moments, shape how it travels between those moments with graph curves, and lock those changes to the song's beat and bar grid. This post is about that timeline in depth: what a keyframe means here, how curves control motion, how beat and bar markers keep everything in time, and how clips and loop regions let you compose sections instead of babysitting one global slider for the whole track.
One document, two editors, one renderer
The two editors are not two products. The Classic Editor and the Studio Workstation open the same saved document, so a look you rough out in the guided flow is the exact scene you keep animating in the Studio, and nothing is lost in translation between them. That shared document is why moving to the timeline never means rebuilding from scratch. You can pick an engine, mode, palette, and audio bindings quickly in Classic, then switch to the Studio when you want the scene to change over time rather than hold one pose. The keyframes and curves you add there are stored in the same file the Classic Editor reads.
Both editors also drive one deterministic renderer, which is the quiet fact that makes serious keyframing possible. The preview you scrub is produced by the same code path that produces the export, so the frame under the playhead at a given beat is the frame that will render. There is no separate offline pass that reinterprets your timing, and no drift between what you tuned and what ships. That determinism matters most when your animation is tied to musical moments: if a color slams to white on the downbeat in preview, it slams to white on the downbeat in the file. You author against the final result, not an approximation of it.
What a keyframe is here
A keyframe is a recorded value for one parameter at one point in time. Place two of them, and the timeline knows the parameter should be the first value here and the second value there, then works out everything in between. That is the whole idea, and it is deliberately general: the timeline does not care whether the parameter is a particle count, a hue, a rotation, a layer's opacity, or the strength of an audio binding. Any of them can hold keyframes, because the Studio exposes properties as tracks and a track is simply a place to record values over time. Animation is available wherever a setting is, rather than being confined to a short list of blessed controls.
Setting a keyframe is a matter of position and change. You move the playhead to the moment you care about, adjust the parameter to the value you want there, and the timeline records it as a keyframe on that parameter's track. Move the playhead again, change the value again, and you have a second keyframe with motion running between them. Because the whole document supports full undo and redo, exploration is cheap; you can lay down a change, watch it, and step back if it is wrong without unwinding the rest of the scene. Common things to keyframe include the following.
- Color and palette values, so a scene shifts hue between sections
- Geometry and scale, to open a shape up for a chorus and tighten it for a verse
- Direction and rotation, for slow drifts or sharp turns at a transition
- Layer opacity and blend amounts, to fade elements in and out
- The strength of an audio binding, so reactivity reaches further in loud passages
- Parameters that depth modes expose, such as column height or tube travel
Graph curves: shaping the motion between keyframes
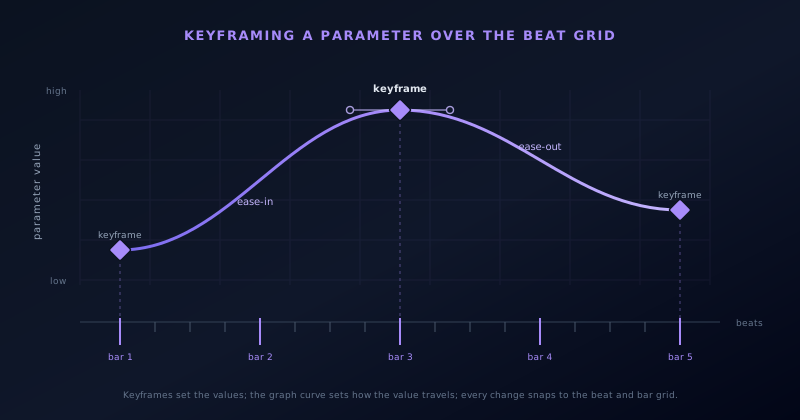
Two keyframes define where a parameter starts and ends, but not how it gets there, and that gap is where graph curves come in. A curve describes the path a value takes between keyframes: a straight line moves at constant speed, an ease-in starts slow and accelerates, an ease-out rushes then settles, and a hold keeps the value flat until the next keyframe snaps it. The Studio shows these as editable curves on the parameter's track, so you are not guessing at an abstract easing name; you are looking at the actual shape of the motion and dragging its handles until the timing feels right. The curve is the difference between a value that lurches and a value that glides.
Curve choice is what separates mechanical animation from musical animation. Linear interpolation reads as robotic because nothing in a performance moves at a truly constant rate, while eased curves mimic the way real motion accelerates and decelerates, and held curves let a value sit still and then change all at once on a hit. A slow ease-in on a scale parameter makes a chorus feel like it swells into place; a sharp curve into a held value makes a drop feel like it lands. Because the graph is directly editable, you can shape a single transition until it matches the phrasing of the music rather than accepting a preset feel. The common curve shapes are worth knowing by name.
- Linear: constant speed, useful for steady drifts and machine-like motion
- Ease-in: slow to start, then accelerate into the next keyframe
- Ease-out: fast to start, then settle gently at the target
- Ease-in-out: a smooth swell that both starts and ends softly
- Hold: flat until the next keyframe, for changes that must snap on a hit
- Custom: drag the handles to a bespoke shape when none of the above fits
Anchoring changes to beat and bar markers
A visualization is only convincing when its changes land with the music, and that is what the beat-aware timeline is for. The Studio lays a grid of beat and bar markers along the ruler, derived from the track's tempo, so you are not eyeballing seconds and hoping a transition falls on a downbeat. You drag a keyframe and it snaps to the nearest beat or bar, which means a color change, a scale swell, or a layer fade can be placed exactly on the musical event it is meant to accompany. Working against beats and bars instead of raw time is the single biggest reason a Studio piece feels tight rather than approximately in sync.
The bar markers also give you the larger structure to compose against. Songs are built in phrases and sections that fall on bar boundaries, so seeing bars on the ruler lets you plan at the level of musical form: put the big change at the top of bar seventeen, let a build run across four bars, hold the drop for eight. Because keyframes anchor to that grid, editing tempo or nudging a section keeps your changes aligned to the beats they belong to rather than stranding them at absolute timestamps. You are animating relative to the music's own clock, which is exactly the clock a viewer feels.
Keyframes and reactivity are not rivals
It is tempting to think of authored keyframes and live audio reactivity as two ways to do the same job, but they solve different halves of the problem and are strongest together. The reactivity engine reads the audio as a 32-band FFT plus BPM and onset detection, and it drives the fast, moment-to-moment motion: the flicker of particles on a hi-hat, the jump of bars on a kick, the swell of a bloom on a sustained note. That is motion no one wants to keyframe by hand, because it changes dozens of times a second and should follow the actual waveform, not a guess about it. Reactivity owns the fine grain.
Keyframes own the coarse grain, the structure the audio alone cannot know about. Which section is loud, when the scene should change character, how far a reaction should reach in a chorus versus a verse: those are authorial decisions, and you make them by keyframing parameters over time. The two layer cleanly because you can keyframe the strength of a binding itself. Keep a particle burst tied to onsets for its liveliness, then keyframe how strongly onsets push it, so the same reactive motion is restrained in the intro and unleashed in the drop. The audio supplies the pulse; your keyframes supply the arc that tells the pulse how hard to hit.
Clips: giving a parameter a start and an end
Not every animation should run for the whole song, and clips are how you bound one to a region. A clip is a span on the timeline with its own start and end, holding the keyframes for a stretch of behavior, and it lets you say that a particular motion exists only here. A camera drift that should happen only during the bridge lives in a clip over the bridge; a burst of extra layers that belongs to the final chorus lives in a clip there. Outside the clip, the parameter simply is not being animated by it, which keeps the rest of the timeline clean and makes each section's behavior something you can see and move as a unit.
Clips also make a long piece manageable to build and revise. Because a section's animation is packaged in a clip, you can drag it, trim it, or duplicate it without disturbing the keyframes around it, which is far easier than surgically editing a single unbroken run of keyframes across three minutes. If the arrangement changes and a section moves, the clip moves with its contents intact. Thinking in clips also encourages composing the video the way the song is composed, section by section, so the timeline reads as a map of the arrangement rather than an undifferentiated field of dots. Each clip is a chunk of intent you can reason about on its own.
Loop regions: motion that repeats with the bars
A great deal of music is built on repetition, and hand-keyframing a repeating motion for every bar of a four-minute track would be miserable. Loop regions solve that by repeating a span of animation across a range of bars. You author one or two bars of motion, mark the region as a loop, and the timeline cycles it for as long as the loop runs, so a steady pulse, a rotating element, or a recurring pattern keeps going without a keyframe for every instance. Because the region is defined against the bar grid, the loop stays locked to the tempo, and each repeat lands on the beat rather than slowly sliding out of phase.
Loop regions pair naturally with clips and reactivity to build layered structure without tedium. A looped base motion can run underneath a section while a clip layers a one-off change on top, and reactivity adds the live detail over both, so a section has a repeating spine, a bit of authored variation, and audio-driven texture at once. When you want the loop to evolve, you can keyframe a parameter outside the loop, letting the repeating motion stay constant while something around it drifts. The point is economy: you describe the pattern once and let the timeline honor it across the bars, spending your effort on the moments that actually differ.
A worked example: animating a drop
Consider building the classic build-and-drop that so much electronic music turns on, since it exercises every part of the timeline at once. Through the build, you keyframe a scale or intensity parameter to climb bar by bar with an ease-in curve, so the scene visibly tightens as the music does, and you keyframe the strength of an onset binding upward so the reactive detail grows more insistent toward the top. On the downbeat of the drop, you place keyframes with a hold curve into their new values, so color, scale, and layer opacity all snap at once, and the change lands hard because nothing eases into it. The build swells; the drop hits.
After the impact, the section settles into a groove that the timeline can carry for you. You define a loop region across a couple of bars for the steady pulsing motion of the drop, let reactivity drive the per-beat detail on top, and add a clip for any one-off flourish, like a color sweep every eight bars. When the second drop comes, you duplicate the clip and adjust rather than rebuild. The whole sequence is a few dozen deliberate keyframes plus a loop and a couple of clips, and because it is anchored to beats and bars, it stays tight if you change tempo or move a section. That is the difference between a scene that reacts and a scene that performs.
Layers, groups, and how animation scopes
Animation in the Studio does not happen in a vacuum; it happens against ordered layers, and understanding that scoping keeps a complex timeline legible. Each layer is a stackable element with its own parameters, so keyframing a layer's opacity, blend mode amount, or transform animates just that element, leaving the layers below and above untouched. There is no fixed cap on how many layers you stack, so you can give a busy section several independently animated elements: a reactive base, an authored accent, a masked overlay, each with its own keyframes on its own tracks. Because the animation belongs to the layer, you can solo, reorder, or restyle a layer without unpicking everyone else's motion.
Groups extend that scoping upward, letting you animate a set of layers as one. When several elements should move together, grouping them means a single transform or opacity keyframe on the group animates the whole set, which is both less work and a cleaner mental model than keyframing each layer in lockstep. Masks and blend modes participate too, so you can keyframe a mask to reveal a layer over a bar or ramp a blend amount across a transition. The layer stack is the structure, and keyframes, clips, and loops are the motion applied to it, so a well-organized set of layers and groups is what makes an ambitious animation something you can keep editing rather than a tangle.
Animating inside depth modes
Depth in Novus Visualizers is not a global switch; it lives inside specific modes, and the timeline animates the parameters those modes expose just as it animates flat ones. There is no separate 2D or 3D toggle to keyframe and no template system to fight, only the actual controls of the mode you chose. In the Bars engine's 3D Columns mode you can keyframe column height, camera angle, or depth spacing; in the Spectrum engine's Spectral Mesh you can animate the mesh's relief; in the Waveform engine's 3D Surface you can drive the surface over time; and in the Tunnel engine's tube modes you can keyframe the travel through the corridor. The dimensionality is a property of the mode, and its parameters are tracks like any other.
That consistency is what makes depth modes worth animating rather than merely reacting. A slow keyframed camera move across a Spectral Mesh gives a chorus a sense of arrival that a static camera cannot, and an eased ramp on tube travel can turn a Tunnel scene from a fixed corridor into a flight that accelerates into a drop. Because these are ordinary parameters on the timeline, they obey the same curves, beat markers, clips, and loops as everything else, so a depth move can be anchored to a bar, held on a hit, or looped through a section. You are not learning a second animation system for 3D; you are pointing the same timeline at the parameters a depth mode happens to expose.
Deterministic export closes the loop
All of this authoring is only worth doing if the export honors it exactly, and that is where the deterministic renderer pays off a second time. When you are satisfied, you export from the same document you have been editing, and the render walks the same timeline you scrubbed: the keyframes, curves, beat-anchored changes, clips, and loops all resolve to the frames you previewed. Export runs client-side through WebCodecs to MP4 (H.264) or WebM (VP9), up to 4K at 24, 30, or 60 fps, with platform presets for common destinations. The output carries no watermark and there is no export quota, so the finished video is genuinely yours to publish.
Because the render is deterministic, exporting at a higher resolution or a different frame rate does not reinterpret your timing; a change placed on the downbeat is on the downbeat at 4K and 60 fps just as it was in preview. That reliability is what lets the timeline be an authoring tool rather than a rough sketch you have to babysit through export. Once you internalize the loop, the workflow is straightforward: rough the look in the Classic Editor, take it into the Studio to keyframe parameters against beats and bars, shape the motion with curves, and compose sections with clips and loops. What you end up with is a visualization that follows the music's structure, which is the whole reason to move past a single static setting.
Frequently asked questions
Quick answers to common questions about this topic.
Can I keyframe any parameter, or only a few?
Effectively any property the document exposes can be keyframed on the timeline: colors, geometry, direction, layer opacity, blend amounts, mask and group settings, the parameters that depth modes expose, and the strength of each audio binding. The timeline treats a property as a track and records a value at the playhead, so animation is available wherever a setting is.
Do keyframes replace audio reactivity?
No. Reactivity from the 32-band FFT, BPM, and onset detection handles the moment-to-moment motion, while keyframes carry the authored structure across sections. They combine rather than compete: you keyframe the reach of a binding, and the audio still drives the motion within that reach. Both feed the same deterministic renderer.
Will keyframed timing drift out of sync when I export?
No. The preview and the export run the same deterministic renderer, so the frame you see under a beat marker is the frame that renders. Export is client-side WebCodecs to MP4 (H.264) or WebM (VP9) up to 4K at 24, 30, or 60 fps, with no watermark and no export quota.
What is a loop region for?
A loop region repeats a span of animation across a set of bars, so you can author one or two bars of motion and have the timeline cycle it instead of copying keyframes down the whole track. It is the practical way to build a steady, repeating pulse without hand-placing hundreds of keyframes.
Related workflow
A track to a release-ready visualizer, per platform
Render the visual once, then produce the platform masters from it, instead of re-rendering the whole video for every aspect ratio.
- Render the beat-synced videoNovus Visualizers: Pick the engine and mode against your actual track; the analysis is done on your audio, not on a preset preview.
- Trim or upscale the exportNSS Background Remover: The video utilities handle the tidy-up pass so the render does not have to be repeated to fix ten seconds of it.
- Produce the per-platform mastersNovus Convert: Each destination wants a different container and bitrate; converting the finished render is far cheaper than re-rendering it.
Related troubleshooting
Was this page helpful?
Your answer stays in this browser, it is not sent anywhere and no account or cookie is involved.