2026 · Novus VisualizersAbout 15 min readNovus Stream Solutions
Classic Editor or Studio Workstation: which one to open
Two editors, one saved document. Reach for the Classic Editor when you want a fast, guided, beat-synced result; move to the Studio Workstation when you need frame-level control over layers, timing, and compositing. You can switch between them mid-project without losing a thing.
Reviewed and updated August 1, 2026. Re-checked against the Novus Visualizers V3 catalog on August 1, 2026. The app now ships ten engines with six modes each (sixty modes in total), so the counts, the engine list, and the mode arithmetic in this article have been corrected. The Logo engine landed after this piece was first published.
Contents
- 1.Overview
- 2.First, understand that it is one document with two doors
- 3.What the Classic Editor is for
- 4.What the Studio Workstation is for
- 5.A rule of thumb you can apply in ten seconds
- 6.The real workflow: start in one, finish in the other
- 7.The real tradeoff is attention, not capability
- 8.The controls you already know carry across
- 9.When the timeline is the reason to move
- 10.Layers, groups, masks, and blend modes
- 11.Character rigs and the depth that lives inside modes
- 12.Export is the same finish line either way
- 13.So which one should you open right now?
Overview
There are two doors into the same room. You upload a track, you want a beat-synced video, and the app offers two ways in: the Classic Editor and the Studio Workstation. New users often stall at the question of which to open, treating it like a fork they cannot walk back from. It is not that. The honest short answer is this: open the Classic Editor when you want a good result fast and are happy to be guided, and open the Studio Workstation when you need to place things frame by frame and control every layer. This post is a decision guide for making that call quickly, and for understanding why it is a low-stakes call to begin with.
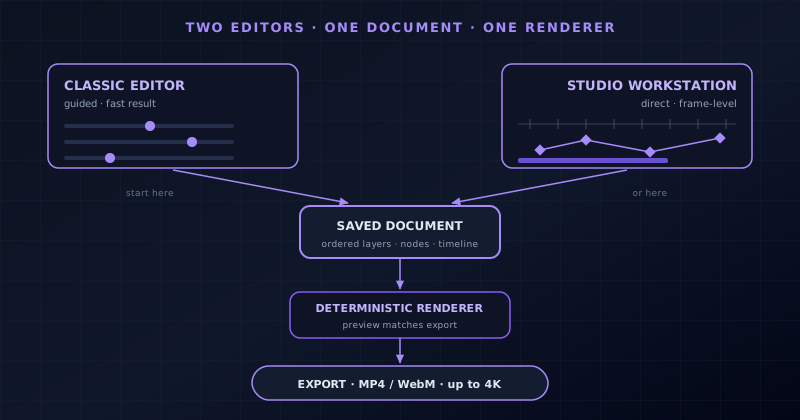
The reason it is low-stakes is structural, and it is worth stating before anything else. Both editors are views onto the same saved document, and both render through the same deterministic engine, so the preview you see matches the video you export in either one. You are not choosing a file format or a project type you will be locked into for the life of the piece. You are choosing which set of controls to work through today. Start in the Classic Editor, and you can open that exact same piece in the Studio Workstation to push it further. That single fact reshapes the whole decision, so the rest of this guide leans on it heavily.
First, understand that it is one document with two doors
The most useful thing to internalize is that the Classic Editor and the Studio Workstation are not two apps that happen to produce similar files. They read and write one saved document. Pick the Particles engine in its Starfield mode, set your colors, wire the bass energy to the size of a layer, and save. That state lives in the document, not in the editor you happened to use to create it. Open the same document in the other surface and every one of those choices is present, expressed through that surface's own controls. There is no export-and-reimport, no conversion step, and no fidelity loss at the boundary. The document is the source of truth, and the two editors are simply two ways of touching it.
Just as important, both surfaces render through the same deterministic renderer. Determinism here means that the same document plus the same track always produces the same frames, so what you scrub in the preview is exactly what the export encodes, in the Classic Editor and in the Studio Workstation alike. That is why moving between them is safe: the pro surface cannot make a piece look one way in preview and another on export, because both editors and the export path share one renderer. When people worry that the more powerful editor will subtly change the look, this is the reassurance. The look is a property of the document and the renderer, not of the door you walked through to reach it.
What the Classic Editor is for
The Classic Editor is the guided path, and guided is a feature rather than a limitation. It walks you through the decisions in order: upload your audio, pick one of the ten engines and one of its six modes, then tune the look (colors and per-element color, geometry, direction, the audio bindings that decide what reacts to bass, mid, and treble, plus captions, logos, and overlays) and export. Every control is laid out and labeled, so you are choosing from options that are in front of you rather than assembling a scene out of nothing. For most tracks and most creators, this is the entire job, and it is designed to be finishable in a single sitting without a manual open on the side.
What the Classic Editor optimizes for is time to a result. You are never staring at a blank canvas wondering where to begin, because the engine-and-mode choice hands you a complete, already-reacting look that you then adjust to taste. The path is linear enough that a first-timer can follow it to a finished video, and deep enough that the result feels like theirs rather than a stamped-out default: there is no preset gallery you are choosing a canned look from, only real engines reacting to your specific track. When someone asks which editor to open and offers no other detail, the Classic Editor is the right default answer nearly every time, and the honest one.
What the Studio Workstation is for
The Studio Workstation is the direct-manipulation path for when the guided flow is not enough. Instead of stepping through panels in sequence, you work on the canvas itself, with ordered layers you stack and reorder freely and a node-based structure underneath that exposes every control the document holds. The defining addition is time: a beat-aware timeline with beat and bar markers, clips and loop regions, and keyframes with graph curves, so you can make a parameter change at a specific moment and shape how it eases in and out. Where the Classic Editor sets a look that then reacts to the whole track uniformly, the Studio Workstation lets you say this happens here and that happens there, on the musical grid.
That control extends across the whole composition. You get groups for organizing layers, masks and blend modes for compositing them, character rigs for posing the Character Motion engine's performers by hand, and full-document undo and redo so any change anywhere is reversible. It is more surface to learn, and it asks more of you, which is exactly why it is the second door rather than the front one. You reach for it when the piece has a structure (an intro that behaves differently from the drop, a logo that must appear on a specific bar, a layer that should fade only during the bridge) that a single, uniform, guided look cannot express on its own.
A rule of thumb you can apply in ten seconds
If you want a single question to decide by, ask whether your piece needs anything to happen at a specific moment. If the answer is no (you want a great-looking, beat-synced visual that reacts consistently across the track), the Classic Editor will get you there faster and with less to learn. If the answer is yes (something must change on a particular beat, bar, or section), that is the signal to open the Studio Workstation, because moment-specific control is precisely what the timeline and keyframes exist for. Almost every real decision between the two collapses down to that one question, and you can usually answer it before you have even uploaded the track you are working with.
A few concrete tells make the call even faster. Choose one or the other based on the shape of the work, not on how advanced you think you should look. Plenty of finished, polished videos never need the Studio Workstation at all, and using it when you do not need it only spends effort you could have kept.
- Open Classic when: you want a fast result, the look should react uniformly across the track, and you are content adjusting a guided set of controls.
- Open Studio when: you need timed events, per-moment keyframes, or precise layer compositing with masks and blend modes.
- Open Classic first, then Studio when: you like the look you built quickly but now want to time a few specific moments to the music.
- Stay in Classic when: captions, a logo, colors, and an engine-and-mode choice already cover everything the piece actually needs.
The real workflow: start in one, finish in the other
The most freeing way to use the two editors is to stop treating them as an either-or and start treating them as a sequence. Because they share the document, the natural workflow for an ambitious piece is to block it out in the Classic Editor (get the engine, mode, palette, and audio bindings to a look you like, quickly) and then open that same document in the Studio Workstation to do the frame-level work: keyframe the moments, mask a layer, time the logo to a bar. You get the speed of the guided path for the large majority of the work that is just picking a good look, and the precision of the pro path for the small part that genuinely needs authored timing.
The handoff runs in both directions, which matters more than it first sounds. If you started something detailed in the Studio Workstation and simply want to swap the palette or change the engine's mode, you can open the piece in the Classic Editor, make that broad change through the simpler controls, and go back. Nothing you keyframed is lost, because the timeline and layer work live in the same document the Classic Editor is editing. There is no ceremony to crossing the boundary and no penalty for crossing it repeatedly. Treat the two as a single tool with a fast mode and a precise mode, and pick whichever fits the change you are making right now.
The real tradeoff is attention, not capability
It helps to name what you actually trade when you pick one editor over the other, because it is not quality. Both surfaces render through the same engine, so neither produces a better-looking result in principle: a Classic Editor video is not a lesser video. What you trade is attention. The Classic Editor spends your attention efficiently by making most decisions for you and asking only for the ones that shape the look. The Studio Workstation spends more of your attention in exchange for more control, because every layer, keyframe, mask, and blend mode is now a decision you are making by hand. Choosing between them is really choosing how much of your attention this particular piece deserves.
Framed that way, the choice stops being about prestige and becomes about fit. A quick social clip does not warrant the attention the Studio Workstation asks for, and forcing it through the pro surface is wasted effort; a signature release that has to hit specific moments does warrant it, and forcing that through the guided flow leaves control on the table. The skill is not always reaching for the more powerful tool but matching the tool's demand on your attention to what the piece needs. Most creators, most of the time, will find the Classic Editor is the right level of investment, and will recognize the specific moments when a piece has earned a session in Studio.
The controls you already know carry across
Part of what makes the handoff painless is that the core creative choices mean the same thing in both editors. The ten engines and their six modes are the same set on both sides; a color you chose is the same color; an audio binding that ties bass energy to a layer's scale is the same binding. The Studio Workstation does not replace those controls; it exposes them at a finer grain and adds the ability to animate them over time. So moving to Studio is not relearning the app from scratch. It is the same vocabulary with more punctuation, where a value you could only set once in the Classic Editor becomes a value you can keyframe across the timeline in the Studio Workstation.
This continuity is deliberate. Because the underlying document describes every control as normalized nodes and value ranges, the same parameter is addressable whether you meet it as a labeled slider in the Classic Editor or as a keyframable node in the Studio Workstation. That shared substrate is why there is no translation step between the two: they are both generating their controls from the one document schema. For you, the practical effect is that skills transfer completely in both directions, and the decision of which editor to open never carries the hidden cost of throwing away what you learned in the other one. Nothing you learn on one side is stranded there.
When the timeline is the reason to move
The single clearest reason to leave the Classic Editor is time-based structure, so it is worth being specific about what the Studio Workstation's timeline gives you. It is beat-aware, marked with beats and bars derived from the track's tempo, so you are not eyeballing raw seconds; you are placing events on the musical grid the audio actually follows. Clips and loop regions let you isolate and repeat sections; keyframes let you set a parameter's value at chosen moments; and graph curves let you shape the transition between those moments, so a change can snap, ease, or accelerate rather than only jumping linearly. That is the toolkit for building a visual that has an arc rather than a single constant state.
Consider what this unlocks in practice. An intro that is sparse and slow, a drop where a second layer slams in on the downbeat, a bridge where the palette cools and the motion calms, an outro that resolves: none of that is expressible as a single uniform look, and all of it is routine on a beat-aware timeline. The Classic Editor's reactivity is genuinely musical, because the 32-band FFT, BPM, and onset analysis drive the look across the whole track automatically; what the timeline adds is authored structure on top of that automatic reactivity. When a piece needs both (reacting to the music and hitting specific marks), the Studio Workstation is where those two things meet and cooperate.
Layers, groups, masks, and blend modes
Beyond time, the other reason to open the Studio Workstation is composition. Both editors work with ordered layers, and there is no fixed cap on how many you stack, but the Studio Workstation is where you manipulate them directly: reorder them on the canvas, gather related ones into groups, and combine them with masks and blend modes to build a composited image rather than a single-engine scene. A mask lets one layer show through the shape of another; a blend mode changes how a layer's color combines with what sits beneath it. Together they turn a stack of independent visuals into a deliberately composed frame, which is the kind of control a layered release genuinely deserves.
This is the difference between decorating one engine's output and directing a scene. In the Classic Editor you are tuning a look; in the Studio Workstation you can set a Spectrum layer behind a Particles layer behind a masked logo, each reacting to its own slice of the audio, blended into a coherent whole. None of that composition is necessary for a strong single-engine visualizer, which is exactly why it lives in the second editor rather than the first. But when a piece calls for it, the layer tools, groups, masks, and blend modes are the reason the Studio Workstation exists. If your idea is really several visuals stacked with intent, that idea belongs in Studio.
Character rigs and the depth that lives inside modes
A specific capability only the Studio Workstation offers is manual character rigging for the Character Motion engine. That engine has six modes, running from Glyph Field and Word Wave through the ASCII Cascade to a 2D Puppet, a 3D Performer, and a Crowd or Clone mode. The Classic Editor lets you pick and tune those modes, but building and posing a rig by hand is Studio work. If you want a character to move deliberately rather than only react to the audio, the rig tools in the pro surface are where that authored motion comes from. It is a narrow feature, but it is a clean example of the kind of hand control that separates the two editors from each other.
It is worth clearing up a common misconception here: there is no separate 2D, 3D, or 4D switch anywhere in the app. Depth is a property of specific modes, not a global toggle. The Bars engine's 3D Columns, Spectrum's Spectral Mesh, Waveform's 3D Surface, Character Motion's 3D Performer, and the Tunnel engine's tube and corridor modes are where dimensionality comes from. You choose depth by choosing one of those modes, in either editor, and then tune its camera and depth parameters. Knowing this saves you hunting for a 3D button that does not exist: the decision is which mode to run, not which dimension to switch on somewhere in a menu.
Export is the same finish line either way
Wherever you did the work, the export is identical, because both editors feed the one client-side export pipeline. Encoding happens in your browser through WebCodecs (nothing is uploaded to a render server) and produces MP4 with H.264 or WebM with VP9, at resolutions up to 4K and frame rates of 24, 30, or 60, with platform presets that size the output for wherever it is headed. The result is copyright-free, carries no watermark, and is not subject to any export quota, whether it came out of a two-minute Classic Editor session or an hour in the Studio Workstation. The finish line does not care which door you started at, and neither should you.
This is the practical payoff of the shared-renderer design. Because the deterministic engine that drew your preview is the same one the export encodes from, the file you get is the piece you saw, frame for frame, in either editor. There is no separate render mode with its own surprises, and no reason to fear that the more powerful editor produces a heavier or different export. Export is a property of the document and the pipeline, not of the editing surface you happened to use. So you can choose the editor purely on how you want to work, and trust that the video coming out will be exactly what you built. Decide by the task, never by the output.
So which one should you open right now?
Put it all together and the guidance is simple. If you are new, or the piece is straightforward, or you just want a strong beat-synced video without fuss, open the Classic Editor. It is the default for good reason, and it will carry more work than people expect, captions and logos and overlays included. If the piece needs timed events, keyframed parameters, layered compositing, or a hand-posed character, open the Studio Workstation, because those are the specific things it was built to give you. And if you are unsure, start in the Classic Editor; you lose nothing by moving to Studio later, and you will often discover the guided path was already more than enough.
The mistake to avoid is treating the choice as permanent or as a statement about your skill level. It is neither. It is a choice about the kind of change you are making at this moment, and the same document welcomes you in through either door and remembers everything you did in the other. Experienced creators bounce between the two within a single project (blocking out looks in the Classic Editor, timing moments in the Studio Workstation, popping back to Classic to swap a palette) precisely because the app is designed to let them. Open whichever fits the next change you want to make, and change your mind freely whenever the work does.
Frequently asked questions
Quick answers to common questions about this topic.
Should I use the Classic Editor or the Studio Workstation?
Open the Classic Editor for a fast, guided, beat-synced result; open the Studio Workstation when you need frame-level control: timed events, keyframes, layered compositing. Both editors edit the same saved document, so you can start in one and finish in the other without redoing anything.
Can I move a project between the two editors?
Yes. They read and write one saved document and render through the same deterministic engine, so opening a piece in the other editor keeps every choice intact. There is no export, reimport, or conversion at the boundary, and no loss of fidelity.
Is the Studio Workstation better than the Classic Editor?
Neither produces a better-looking video; both render through the same engine. The Studio Workstation trades more of your attention for finer control. Most pieces are well served by the Classic Editor; reach for Studio when the work needs timed structure or layered compositing.
Do I lose anything by exporting from the Classic Editor?
No. Both editors feed the same client-side WebCodecs export (MP4 or WebM up to 4K at 24, 30, or 60 fps, copyright-free, with no watermark and no export quota), so the finished file is identical regardless of which editor you used to build it.
Related workflow
A track to a release-ready visualizer, per platform
Render the visual once, then produce the platform masters from it, instead of re-rendering the whole video for every aspect ratio.
- Render the beat-synced videoNovus Visualizers: Pick the engine and mode against your actual track; the analysis is done on your audio, not on a preset preview.
- Trim or upscale the exportNSS Background Remover: The video utilities handle the tidy-up pass so the render does not have to be repeated to fix ten seconds of it.
- Produce the per-platform mastersNovus Convert: Each destination wants a different container and bitrate; converting the finished render is far cheaper than re-rendering it.
Related troubleshooting
Was this page helpful?
Your answer stays in this browser, it is not sent anywhere and no account or cookie is involved.