2026 · Novus VisualizersAbout 16 min readNovus Stream Solutions
Inside the Studio Workstation: layers, timeline, and keyframes
A deep dive into the Studio Workstation (direct canvas editing, ordered layers, a beat-aware timeline with beat and bar markers, keyframes with graph curves, clips and loop regions, groups, masks, and blend modes) and how it shares one saved document and one renderer with the guided Classic Editor.
Reviewed and updated August 1, 2026. Re-checked against the Novus Visualizers V3 catalog on August 1, 2026. The app now ships ten engines with six modes each (sixty modes in total) so the counts, the engine list, and the mode arithmetic in this article have been corrected. The Logo engine landed after this piece was first published.
Contents
- 1.Overview
- 2.One document, one renderer
- 3.Direct manipulation on the canvas
- 4.Ordered layers with no ceiling
- 5.Each layer carries its own engine and mode
- 6.A timeline that knows the beat
- 7.Keyframes and the graph editor
- 8.Clips and loop regions
- 9.Groups and parent transforms
- 10.Masks: one layer shaping another
- 11.Blend modes for light and glow
- 12.Character rigs in the Studio
- 13.Undo, redo, and moving between editors
Overview
The Studio Workstation is where Novus Visualizers stops being a form to fill in and becomes a canvas to build on. Where the Classic Editor walks you through a sequence of choices (upload a track, pick an engine and a mode, tune colors and captions, export) the Studio Workstation hands you the frame directly and lets you compose it layer by layer, moment by moment. It is the node-based, direct-manipulation surface for anyone who has outgrown the guided flow and wants to arrange several visual elements, time them to specific beats, and shape exactly how they enter and leave. This post is a tour of what that surface actually gives you, and why it never forces you to abandon the simpler editor to use it.
The important thing to understand up front is that the two editors are not two apps. They are two windows onto one saved document, drawn by one renderer. Anything you build in the Studio Workstation opens in the Classic Editor, and anything you set up in the Classic Editor opens in the Studio Workstation, because both are editing the same underlying project file. That single fact shapes everything that follows: the layers, the timeline, the keyframes, and the compositing are all just a richer way of describing the same document the guided editor produces, so nothing you learn on one side is stranded there. Open the workstation at visualizers.novusstreamsolutions.com/editor and it is the same track, the same scene, more directly in your hands.
One document, one renderer
Every project in Novus Visualizers is a single saved document: the track, the layers, their engines and modes, the color and geometry settings, the audio bindings, the captions and logos, and the timing of all of it. The Classic Editor writes to that document through guided controls; the Studio Workstation writes to the same document through direct editing. There is no export from one editor into the other and no conversion step, because there is nothing to convert. Switching editors is switching your view of one file, the way an outline view and a page view can show the same manuscript differently. Work saved from either side is the same work, and it opens where you left it because it lives on your account rather than in one editor's memory.
The second half of that guarantee is the renderer. Both editors, and the final export, are driven by one deterministic renderer: the same code computes every frame whether you are scrubbing a preview or writing an MP4. That is why the preview matches the export rather than approximating it: there is no separate draft engine that gets swapped for a render engine at the end. When you place a keyframe in the Studio Workstation and watch the effect in the preview, the exported file shows that exact frame, because the same function produced both. Determinism here means a given document at a given frame time always yields the same pixels, and that is precisely what makes tight, keyframed timing trustworthy instead of a moving target you can only confirm after rendering.
Direct manipulation on the canvas
The most immediate difference in the Studio Workstation is that you edit on the canvas itself. Instead of adjusting a position with a numeric field and waiting to see where the element lands, you grab it in the frame and move it, scale it by dragging a handle, rotate it, and shift its anchor point. The thing you are editing and the thing you are looking at are the same object, which collapses the guess-and-check loop the guided editor necessarily keeps. Selecting, nudging, snapping to the frame's center and edges, and reading a value back simply by seeing where a shape sits: these are the ordinary gestures of a canvas tool, and they are what make arranging several elements feel like design rather than data entry.
Direct manipulation matters most when a scene has more than one thing in it. A single engine filling the frame rarely needs positioning; a logo crown in one corner, a spectrum ribbon across the lower third, and a particle field behind both need to be placed relative to each other, and placing them by eye is far faster than describing them in coordinates. The canvas is also where you watch compositing decisions land in context (how a blend mode reads against the layer beneath it, whether a mask's edge falls where you intended) so the visual result and the control over it stay in the same place. None of this removes numeric precision when you want it; it adds the option of working by hand, which is usually the faster way to make things look right together.
Ordered layers with no ceiling
A Studio Workstation scene is a stack of ordered layers, and the order is the composition. Layers higher in the stack draw over the layers below them, so the arrangement of the list is literally the front-to-back arrangement of the frame. You reorder by moving a layer up or down; you hide a layer to check what sits behind it, solo one to see it in isolation, and lock one you are finished with so a stray drag cannot disturb it. Each layer carries its own settings, its own audio bindings, and its own place on the timeline, which is what lets a single scene combine several distinct visual behaviors at once instead of being one effect at a time.
There is no fixed maximum on how many layers a document can hold. You are not budgeting against a slot count; you add the layers a scene needs and order them to taste. In practice a release visual might be a handful (a background engine, a mid-ground spectrum, a foreground particle accent, a logo, and a caption track) but the model does not cap you there, and it does not treat the fifth layer differently from the first. Because layers are ordered rather than numbered into fixed roles, the same document can grow from a one-layer scene into a dense composite without changing tools, and every layer stays an independent object you can retime, rebind, or restyle entirely on its own.
Each layer carries its own engine and mode
A layer in the Studio Workstation is not a generic shape; it is one of the ten engines running one of its six modes. Particles, Trails, Bloom, Character Motion, Radial, Spectrum, Bars, Tunnel, Waveform, and Logo each bring six distinct modes (sixty in total) and any of them can be the content of any layer. That means one scene can stack a Bloom layer running Ink Diffusion behind a Bars layer running Center Mirror behind a Radial layer running Logo Crown, each reacting to the audio in its own way. The layer is the container; the engine and mode are what it draws. Changing a layer's engine or mode restyles that element without disturbing its place in the stack, its timing, or its bindings.
This is also where depth lives. There is no separate two-dimensional or three-dimensional switch to flip and no template to load; dimensionality is a property of specific modes. Bars has 3D Columns, Spectrum has Spectral Mesh, Waveform has a 3D Surface, Character Motion has a 3D Performer, and Tunnel's tube modes carry their own depth. You get a dimensional look by choosing a mode that has one, on the layer where you want it, while the layers around it stay flat if that is what the composition needs. Because depth is per-mode rather than a global toggle, a scene can hold a flat spectrum and a dimensional bar field in the same frame, and each layer keeps exactly the look its mode defines without the others following along.
A timeline that knows the beat
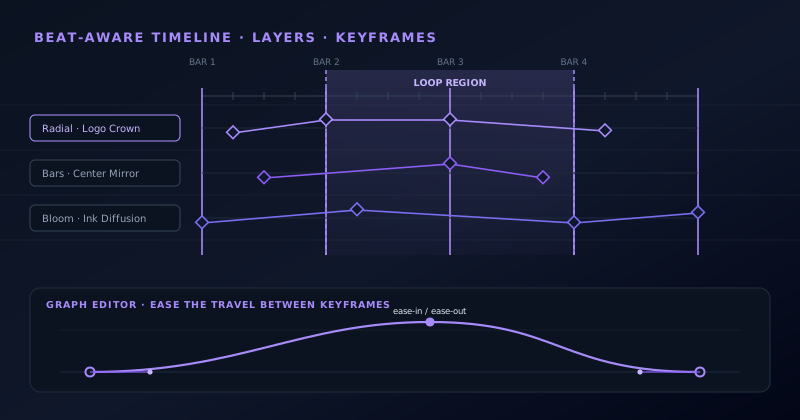
Underneath the canvas runs a timeline, and it is beat-aware. The same audio analysis that drives reactivity (a 32-band FFT with BPM and onset detection) also produces the timing grid you arrange against. The ruler is marked with beat and bar lines derived from the track's tempo, so you are not eyeballing seconds and hoping an event lands on a downbeat; you are placing things against the actual musical grid of the song. When you drag a layer's start, a keyframe, or the edge of a clip, it can snap to those beat and bar markers, which is how you get a cut, an entrance, or an accent to fire exactly on the downbeat rather than a frame early or a frame late.
This is the difference between animating to a stopwatch and animating to the music. A four-bar intro, a drop that arrives at the seventeenth bar, a breakdown that wants everything to fall away for eight beats: these are musical structures, and the timeline describes them in musical units. Because the markers come from the analysis rather than from you tapping tempo by hand, they line up with where the beats actually are, including through tempo that is not a round number. Arranging against that grid makes the timing decisions read as intentional and in-time, and it means the same instincts a listener already has about how a song is built translate directly into where things go on the track.
Keyframes and the graph editor
Keyframes are how you make a value change over time. You set a parameter (a layer's opacity, position, scale, rotation, a color, the intensity of an effect) to one value at one point on the timeline and a different value at another, and the renderer interpolates between them. That is what turns a static arrangement into motion you author rather than leave entirely to the audio: a layer that fades in over the first bar, a logo that scales up on the drop, a spectrum that drifts across the frame over a verse. Keyframes give you command of the deliberate, composed motion, sitting right alongside the automatic, audio-driven motion each engine already produces on its own.
How a value travels between two keyframes matters as much as the values themselves, and that is what the graph curves are for. Rather than every change being a straight linear ramp, the graph editor lets you shape the interpolation (ease in, ease out, hold and then rush, overshoot and settle) by editing the curve between keyframes directly. A linear fade feels mechanical; an eased one feels designed. Because the curves are editable per parameter, a single layer can have a sharp, snappy scale change and a slow, gentle opacity fade running at the same time. Shaping those curves is most of the difference between animation that feels stiff and animation that feels like it has weight and intent behind it.
Clips and loop regions
The timeline is not one undifferentiated span; you can segment it into clips and define loop regions. A clip is a bounded piece of the timeline you can position, trim, and arrange, useful when a scene changes character between sections of a song, so an intro treatment, a verse treatment, and a chorus treatment can be laid out as distinct pieces rather than fought over with a single set of keyframes. Arranging clips along the track is how you give a longer visual a structure that follows the arrangement of the music, section by section, instead of trying to express every change through one continuous stream of curves stretched across the whole runtime.
Loop regions solve a different problem: reviewing and refining a specific passage without playing the whole track. You mark a region (say the four bars around a drop) and play just that span on repeat while you adjust the keyframes and bindings that fire inside it. Because the renderer is deterministic and the timeline is locked to the beat grid, what you tune inside the loop is exactly what plays back in the full timeline and in the export. Loop regions turn the tedious part of timing work (get to the right spot, watch it, tweak, rewind, repeat) into a tight cycle where the passage you actually care about is always in front of you, ready to adjust.
Groups and parent transforms
As a scene grows, individual layers start to belong together, and groups are how you manage that. Grouping a set of layers lets you move, scale, rotate, hide, or lock them as a single unit, so a logo and its glow, or a cluster of caption lines, behave as one object when you reposition them. A group is also a transform parent: a transform applied to the group flows down to its members, so nudging the group nudges everything inside it in concert, while each member keeps its own local position within the group. That nesting is what keeps a busy composition manageable instead of turning every reposition into a dozen carefully coordinated drags.
Parent transforms compose, which is the genuinely useful part. A member layer's final place in the frame is its own transform applied within its group's transform, so you can animate a group as a whole (sweeping a titled block across the frame) while a layer inside it does its own smaller motion at the same time. This is the same principle that makes rigs and complex motion tractable: build local behavior once, then move the container it lives in without redoing the internals. Groups keep related elements together both conceptually and mathematically, so the structure of the layer list ends up mirroring the structure of the scene you are actually building.
Masks: one layer shaping another
A mask uses one layer's shape to control where another layer is visible. Instead of an element filling its whole rectangle, its visibility is governed by a mask, so it shows through only where the mask allows, the classic use being to confine a spectrum or a particle field to a logo's silhouette, a band across the frame, or a soft-edged vignette. Masking is a compositing tool rather than a drawing one: it does not change what a layer draws, only where that drawing lands. In the Studio Workstation you see the masked result on the canvas as you shape it, so the interaction between the mask edge and the audio-driven motion beneath it is visible while you work rather than a surprise waiting at export.
Masks earn their keep when they animate. Because a mask can be keyframed like anything else, the region a layer shows through can move, grow, or soften over time: a reveal that wipes across the frame on a beat, an effect that blooms outward from a single point, a caption that resolves into view. Combined with the beat-aware timeline, a moving mask becomes a way to time visibility itself to the music, not just the motion within a fixed shape. That turns masking from a static cutout into an editing device: what the viewer can see, and precisely when, becomes something you compose as deliberately as the motion happening inside it.
Blend modes for light and glow
Blend modes decide how a layer's pixels combine with the layers beneath it, and for music visuals the light-oriented modes do most of the work. Ordinary stacking hides whatever sits behind an opaque pixel; additive and screen-style blending instead sum light, so bright elements glow and overlap into brighter cores rather than occluding one another. That is how a particle field reads as sparks over a scene instead of a flat sheet of dots, how overlapping trails build into luminous streaks, and how a bloom layer washes light across everything below it. Choosing a blend mode per layer is choosing how that layer participates in the light of the frame, which is a small control with an outsized effect.
Blend modes matter so much here because so much of this material is emissive by nature (spectra, particles, glows, tunnels) and emissive things add light rather than block it. A layer set to a light-summing blend contributes its brightness to the composite, which is why the same particle layer can look like debris in a normal blend and like energy in an additive one. Because the mode is set per layer and combines with that layer's own audio reactivity, a burst on the beat does not merely move; it flares, because more light is being summed at that instant. Getting the blend mode right is often the last step that makes a scene read as lit from within rather than pasted together.
Character rigs in the Studio
The Character Motion engine (with its Glyph Field, Word Wave, ASCII Cascade, 2D Puppet, 3D Performer, and Crowd/Clone modes) is where the Studio Workstation's rigging comes in. A rig is the structure that lets a character, or a field of characters, move as an articulated thing rather than a rigid image: parts that pivot, follow, and respond, driven both by keyframes you set and by the audio the rest of the scene is already reacting to. Building and posing a rig is direct-manipulation work, which is exactly what a canvas-first editor is for, and it lives on its own layer like anything else, so a performing character can sit in front of a spectrum and behind a caption in the same composition.
Rigs benefit from every other Studio feature at once. Their motion is keyframed and curved on the same timeline, so a pose can land on a beat and ease out of it; they can be grouped so a performer and its shadow move together; they can be masked and blended into the scene like any other layer. Because a rig is composed of parts with local transforms nested under a parent, it is the clearest case of why parent transforms exist: move the character and its parts come along, animate a part and the character as a whole stays put. The result is expressive, music-timed character motion built with the exact same tools that arrange the rest of the frame.
Undo, redo, and moving between editors
All of this direct editing is backed by full-document undo and redo. Every change (a drag on the canvas, a new keyframe, a reordered layer, a retimed clip, a blend-mode switch) is a step in one history for the whole document, so you can walk backward and forward through your edits without hunting for which panel a change happened in. That single history is what makes aggressive experimentation safe: try a composite, decide against it, and step back to exactly where you were. Because the history spans the entire document rather than one tool or one layer, undo behaves the way you expect no matter which part of the scene you happened to be working on at the time.
And because the document is shared, none of this locks you into the Studio Workstation. Build a complex layered, keyframed scene here, then open it in the Classic Editor to make a quick color or caption change through the guided controls, and come back; it is the same file the entire way. Export is shared too: the same deterministic renderer writes the final video from either editor, entirely client-side, as MP4 with H.264 or WebM with VP9, up to 4K at 24, 30, or 60 frames per second, with no watermark and no export limit. The Studio Workstation adds depth of control without building a wall around it, which is the whole point of putting both editors on one document and one renderer.
Frequently asked questions
Quick answers to common questions about this topic.
What is the difference between the Classic Editor and the Studio Workstation?
The Classic Editor is a guided flow: upload a track, pick an engine and a mode, tune settings, export. The Studio Workstation is a direct, canvas-first editor with ordered layers, a beat-aware timeline, keyframes, groups, masks, and blend modes. Both edit the same saved document with the same renderer, so you can move between them freely without converting anything.
Is there a limit on how many layers a scene can have?
No. Layers are ordered with no fixed maximum. You add as many as a composition needs and reorder them front-to-back; every layer is an independent object with its own engine, mode, timing, and audio bindings.
Does the preview match the exported video?
Yes. One deterministic renderer draws the preview and writes the export, so a given document and frame time always produce the same pixels. What you keyframe and see in the preview is what the MP4 or WebM file contains.
Do keyframes replace the audio reactivity?
No; they work alongside it. Each engine still reacts to the 32-band FFT, BPM, and onsets automatically, while keyframes and graph curves let you author deliberate, composed motion on top, timed to the beat and bar markers.
Related workflow
A track to a release-ready visualizer, per platform
Render the visual once, then produce the platform masters from it, instead of re-rendering the whole video for every aspect ratio.
- Render the beat-synced videoNovus Visualizers: Pick the engine and mode against your actual track; the analysis is done on your audio, not on a preset preview.
- Trim or upscale the exportNSS Background Remover: The video utilities handle the tidy-up pass so the render does not have to be repeated to fix ten seconds of it.
- Produce the per-platform mastersNovus Convert: Each destination wants a different container and bitrate; converting the finished render is far cheaper than re-rendering it.
Related troubleshooting
Was this page helpful?
Your answer stays in this browser, it is not sent anywhere and no account or cookie is involved.