2026 · Novus VisualizersAbout 15 min readNovus Stream Solutions
Depth without a 3D headache: the visualizer depth modes
Novus Visualizers has no master 2D/3D toggle. Dimensionality lives inside a handful of specific modes (Bars 3D Columns, Spectrum Spectral Mesh, Waveform 3D Surface, Character Motion 3D Performer, and the Tunnel corridor and tubes), so you reach for depth where it earns its cost.
Reviewed and updated August 1, 2026. Re-checked against the Novus Visualizers V3 catalog on August 1, 2026. The app now ships ten engines with six modes each, sixty modes in total, so the counts, the engine list, and the mode arithmetic in this article have been corrected. The Logo engine landed after this piece was first published.
Contents
- 1.Overview
- 2.Why there is no master 3D switch
- 3.Where depth actually lives
- 4.Bars: 3D Columns
- 5.Spectrum: Spectral Mesh
- 6.Waveform: 3D Surface
- 7.Character Motion: 3D Performer
- 8.Tunnel: depth is the whole point
- 9.The cues that make depth read
- 10.Adding dimensionality tastefully
- 11.The performance tradeoffs
- 12.Tuning depth in both editors
- 13.A working recipe: reach for depth on purpose
Overview
Most tools that promise 3D music visuals hand you a switch. Flip it and the entire scene tilts into perspective, whether the design wanted depth or not. It is a satisfying demo and a poor default, because a flat composition that read cleanly a moment ago now looks like a sticker peeled off the glass and rotated in space. The perspective is applied to the finished picture rather than built into how the picture is made, and the eye catches the difference immediately. You end up fighting the toggle back toward something that looks intentional, which is the opposite of what a convenience feature should cost you.
Novus Visualizers takes the other position. There is no 2D/3D/4D toggle and no template library to flip through. Depth is a property of a small set of specific modes, each one built from the ground up in a space that has a near and a far. You reach for those modes when a track genuinely wants dimension, and you leave the rest of the app honestly flat. This post is a tour of exactly where depth lives across the ten engines, how to add it without tipping into gimmick, and what it asks of your machine when you press export.
Why there is no master 3D switch
A single depth control sounds tidy until you notice it treats dimensionality as one interchangeable thing. In practice, depth is produced differently in every family of visual. Extruding equalizer bars into columns is not the same operation as lofting a spectrum into a rippling surface, and neither resembles flying a camera down a tunnel. A universal switch can only do one of two things: apply a shallow fake-perspective transform to whatever is on screen, which looks like a tilted decal, or force ten unrelated engines to share one depth model none of them were designed around. Both choices sacrifice the crispness that makes a flat visualizer look deliberate in the first place.
Scoping depth to the modes where it is native avoids that whole class of compromise. The ten engines each carry six modes, sixty in total, and only a handful of those are constructed in a space with real perspective. That restraint is the point. It keeps Line Spectrum, Center Mirror bars, and a filled waveform sharp and two-dimensional, exactly as they should be, and it means that when you switch to a depth mode you are choosing a different way of drawing the frame rather than smearing an effect over a design that never asked for one. Depth becomes a decision about the medium, not a slider you leave on by accident.
Where depth actually lives
Five places in the app build the image with a genuine third axis. Bars has a 3D Columns mode that stands the equalizer up as boxes with visible tops and sides. Spectrum has Spectral Mesh, a deforming grid surface seen in perspective. Waveform has a 3D Surface mode that lofts the oscillation into a landscape. Character Motion has a 3D Performer, a rigged figure that occupies space rather than a plane. And the entire Tunnel engine is depth by construction, with Corridor Grid, Spectrum Tube, Waveform Tube, and Particle Vortex all receding toward a vanishing point. Everything else in the app is flat on purpose.
What unifies those five is that perspective is baked into how each frame is generated, not painted on afterward. The same audio analysis feeds them as feeds the flat modes: a 32-band FFT for the spectral shape, a BPM estimate for the pulse, and onset detection for the hits. That energy moves geometry through the near-to-far space, so louder bands push columns taller, transients ripple across the mesh, and the beat drives the camera down the corridor. Because one deterministic renderer draws both the preview and the export, what you compose in space is exactly what encodes to file, with no surprise between the editor and the finished clip.
- Bars (3D Columns): the equalizer as extruded boxes with lit tops and shaded sides.
- Spectrum (Spectral Mesh): a frequency grid deformed into a surface and viewed in perspective.
- Waveform (3D Surface): the oscillation lofted into a moving terrain.
- Character Motion (3D Performer): a rigged figure that moves and turns in space.
- Tunnel (Corridor Grid, Spectrum Tube, Waveform Tube, Particle Vortex): motion straight down a vanishing point.
Bars: 3D Columns
The Bars engine offers six ways to draw an equalizer, and 3D Columns is the one that stands it upright. Instead of flat rectangles growing from a baseline, each band becomes a box with a front face, a lit top, and a shaded side, arranged on a receding floor plane. The effect is immediately legible because it borrows a visual grammar people already understand from cityscapes and stage risers: taller means louder, and the tops catch the light. Route the low bands to the front row and the highs to the back, and a bass hit reads as the nearest columns leaping while the treble shimmers in the distance behind them.
The trap with 3D Columns is over-population. Fifty narrow boxes packed edge to edge collapse into visual noise the moment perspective compresses them toward the vanishing point, because the far columns overlap into a solid wall. The fix is to thin the band count and widen the columns so each one keeps a readable top face, then lean on the shading rather than the count to carry the sense of volume. A row of a dozen confident boxes with clear lit tops looks more three-dimensional than a hundred slivers, and it stays crisp when you scale the export up to 4K where every soft edge would otherwise multiply.
Spectrum: Spectral Mesh
Spectral Mesh is the most painterly of the depth modes. It takes the frequency data that would otherwise draw a Line Spectrum and instead lays it across a grid, then lifts each vertex by its band energy so the whole surface undulates like cloth in wind. Seen in perspective, the near edge of the mesh looms large while the far edge tapers toward the horizon, and sustained tones become standing ridges that travel across the sheet as the arrangement changes. It is the mode that most rewards ambient, evolving music, where the value is in slow deformation rather than sharp hits, and where a flat spectrum would feel static by comparison.
Because the mesh is a continuous surface, it lives or dies on its silhouette and its shading. A mesh that is too dense reads as a flat gray field, since the individual peaks are too small to catch light; a mesh that is too coarse looks like a folded map. The sweet spot is a resolution where each ridge is tall enough to cast a gradient down its face, so the surface has a horizon and a foreground your eye can settle into. Keep the color ramp low-contrast along the surface and let the height do the depth work, and the mesh will feel like a landscape rather than a heat map tipped on its side.
Waveform: 3D Surface
The Waveform engine has five flat modes (Line, Mirrored, Filled, Ribbon, and the Oscilloscope and Lissajous figures) and one that steps off the plane. The 3D Surface mode takes the raw oscillation and lofts it into a terrain, extruding the waveform along a second axis so the trace becomes a ridge you look across rather than a line you look at. Where a flat waveform reads the amplitude at a glance, the surface reads its texture: the difference between a smooth pad and a gritty guitar shows up as the roughness of the landscape, and a percussive track carves the terrain into sharp, repeating dunes that march past the camera.
This mode is at its best on material with obvious dynamic contrast, because the depth exaggerates the gap between quiet passages and loud ones. A verse-to-chorus jump that barely registers on a flat line becomes a plain rising into a mountain range on the surface. The thing to watch is orientation: because a lofted waveform has a front and a back, a poorly chosen camera angle can hide the peaks behind their own foreground. Angle the view so the ridges rake across the frame rather than pointing straight at the lens, and the amplitude stays legible while the third axis does the storytelling.
Character Motion: 3D Performer
Character Motion is the engine that turns audio into figures and letters, and most of its modes stay on the plane: Glyph Field, Word Wave, ASCII Cascade, and the 2D Puppet all live in flat space. The 3D Performer is the exception, a rigged figure that occupies real depth, able to turn, lean, and move toward or away from the camera as the track pushes it. Onsets drive its accents, so a snare can snap a limb into a pose while the low end sways the whole body, and the result is closer to a dancer reacting to a mix than to an abstract pattern. It is the most literal of the depth modes and the most demanding to direct.
A performer in space needs the same restraint a real one does. Because the figure can rotate, it can also turn its least expressive angle to the lens, so it pays to constrain the motion so the silhouette stays readable through the beat. The Studio Workstation exposes character rigs directly, which is where you set how far a hit can throw a joint and how quickly it returns, so the figure feels responsive without flailing. Paired with a simple backdrop from a flat engine on a lower layer, a single well-tuned performer carries a whole visual, whereas a crowded stage of clones quickly stops reading as anything at all.
Tunnel: depth is the whole point
Every other engine is flat by default and grows one depth mode; the Tunnel engine is the reverse, built entirely around a vanishing point. All six of its modes send geometry rushing toward or away from the camera. Corridor Grid wraps a wireframe room around the viewer and flies them down it. Spectrum Tube and Waveform Tube take the frequency and time-domain data and bend them into the walls of a pipe you travel through, so the mix literally surrounds the camera. Particle Vortex spirals points inward toward the center, and the two ring modes stack concentric circles that scale up and past you. Depth here is not an option; it is the entire premise.
That makes Tunnel the most reliable way to get a strong sense of motion without hand-animating anything, because the forward travel reads as speed on its own and the beat only has to modulate it. Bind the BPM to the travel rate and the corridor accelerates on the downbeats; bind band energy to the wall displacement and the tube breathes with the arrangement. The one discipline it demands is contrast between the walls and the void ahead, so the vanishing point stays a genuine focal point rather than a muddy center. A dark core with brightly stroked rings gives the eye somewhere to fall, which is exactly what sells the depth.
The cues that make depth read
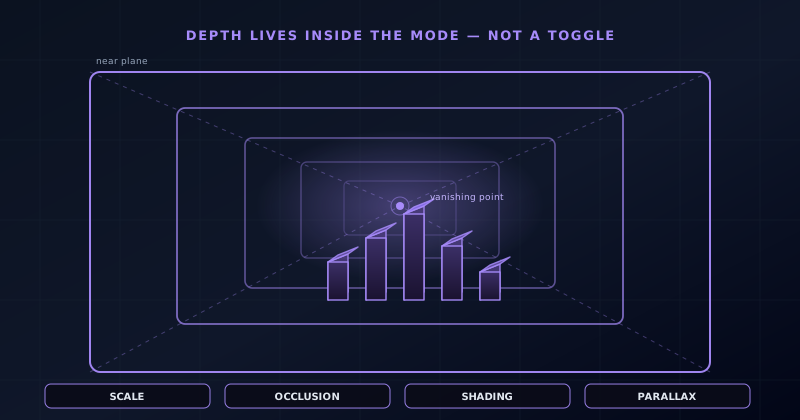
It helps to know why depth reads at all, because the same cues appear in every one of these modes. Scale is the first: objects that shrink as they recede tell the eye they are farther away, which is why the far columns and distant rings need to genuinely get smaller rather than just dimmer. Occlusion is the second: when a near shape overlaps and hides part of a far one, the ordering becomes unambiguous, and this is where ordered layers matter, since a nearer layer that covers a farther one does more for depth than any amount of perspective math. These two cues cost almost nothing and carry most of the weight.
Shading and parallax finish the illusion. A lit top and a shaded side turn a flat box into a solid, and a gradient down the face of a mesh ridge tells you which way the surface bends, so the color ramp is doing structural work, not just decoration. Parallax is the motion cue: when near elements slide across the frame faster than far ones as the camera moves, the brain reads the gap between their speeds as distance. The Tunnel engine leans hardest on parallax, but even a flat scene gains dimension if a foreground layer drifts faster than the background. Lean on these four before you reach for anything heavier.
Adding dimensionality tastefully
The most common mistake is treating depth as a headline rather than a supporting element. A frame that is all perspective (a mesh under a tunnel behind a 3D performer) reads as busy, because the eye cannot decide which recession to trust and the competing vanishing points cancel each other out. The tasteful move is to pick one depth mode as the spine of the composition and let flat layers support it. A single Spectral Mesh with a flat title overlay and a plain radial glow behind it feels dimensional precisely because the flat elements give the eye a stable frame against which the moving surface has somewhere to sit.
Restraint also means matching the depth to the music. Slow, evolving material suits the surfaces and the mesh, where the value is in gradual deformation; driving, percussive tracks suit the tunnel and the columns, where the value is in hits and forward travel. Forcing a 3D Performer onto an ambient drone, or a slow mesh onto a fast breakbeat, produces the uncanny feeling that the visual and the audio are in different rooms. When the depth mode echoes the energy of the track, the dimension feels inevitable rather than applied, and that is the difference between a visual that looks designed and one that looks switched on.
The performance tradeoffs
Depth is not free. A flat Line Spectrum draws a handful of strokes per frame; a Spectral Mesh evaluates and shades a full grid of vertices, and a Particle Vortex moves thousands of points through a perspective transform every frame. That work happens on your own machine, both while you preview and while you export, because the whole pipeline is client-side. The practical consequence is that the depth modes are the ones where resolution and frame rate stop being cosmetic choices and start being budget decisions. A 4K, 60 fps spectral mesh asks far more of your hardware per second of footage than a 1080p, 30 fps flat waveform covering the same track.
The good news is that the deterministic renderer makes those tradeoffs safe to tune. Because the preview is drawn by the same code that encodes the file, what you see while adjusting is what you get, so you can dial the resolution and frame rate down to keep the editor responsive and then step them up for the final pass, confident nothing will shift. Export runs through WebCodecs to MP4 with H.264 or WebM with VP9, up to 4K at 24, 30, or 60 fps, with platform presets, no watermark, and no export quota. If a heavy mesh at 60 fps strains your machine, 30 fps often looks nearly identical for slow, flowing depth and roughly halves the encoding cost.
Tuning depth in both editors
The two editors reach the same depth modes by different routes, and they share one saved document, so you can start in one and finish in the other. The guided Classic Editor is the fastest way in: pick the engine and mode, then tune colors, geometry, direction, audio bindings, captions, logos, and overlays through labeled controls, and the depth is already there because it lives in the mode you chose. For a lot of releases that is the whole job: choose 3D Columns or Corridor Grid, set the geometry so the perspective reads, bind the bands you care about, and export. Nothing about depth requires the advanced surface unless you want to move the camera yourself.
When you do want that control, the node-based Studio Workstation opens the depth up. You edit directly on the canvas with ordered layers, and the beat-aware timeline gives you keyframes and graph curves against beat and bar markers, so a camera push down a tunnel can accelerate on the drop and ease back in the breakdown. Clips and loop regions let you reuse a move, groups and masks let you carve depth out of a flat layer, blend modes let a mesh sit into a background, and character rigs give the 3D Performer its range. Full-document undo and redo means you can push the dimensionality hard and walk it back without losing the rest of the composition.
A working recipe: reach for depth on purpose
Put it together and a dependable workflow emerges. Start flat. Build the composition with the two-dimensional modes first, get the color, the audio bindings, and the captions reading well, and only then ask whether the track actually wants a third axis. If it does, swap in exactly one depth mode as the spine (3D Columns for a beat-driven cut, Spectral Mesh or 3D Surface for something evolving, a Tunnel mode when you want pure forward motion) and keep the supporting elements flat so the depth has a stable frame. Lean on the cheap cues, scale and occlusion and shading, before you touch a camera move, and let the beat drive the motion through the space rather than animating it by hand.
Then treat the export as its own decision. Preview the heavy mode at a lower resolution to keep the editor quick, confirm the depth reads at the crop you are posting to, and step the resolution and frame rate up only for the final encode, trusting the deterministic renderer to keep the preview honest. Because there is no watermark and no quota, you can export a few variants (a 30 fps version for reach and a 60 fps version where the motion warrants it) and keep the one that looks right. Depth handled this way stops being a headache and becomes what it should be: one more deliberate tool you pick up when the music asks for it.
Frequently asked questions
Quick answers to common questions about this topic.
Is there a 3D toggle in Novus Visualizers?
No. There is no separate 2D/3D/4D switch and no preset system. Depth lives inside specific modes: Bars 3D Columns, Spectrum Spectral Mesh, Waveform 3D Surface, Character Motion 3D Performer, and the Tunnel corridor and tube modes. Every other mode is flat by design.
Which modes actually add depth?
Five places across the ten engines: Bars 3D Columns, Spectrum Spectral Mesh, Waveform 3D Surface, Character Motion 3D Performer, and the Tunnel engine (Corridor Grid, Spectrum Tube, Waveform Tube, and Particle Vortex). Pick one of those modes and dimensionality is native to how the frame is built.
Do the 3D modes slow down export?
They ask more of your machine per frame, so pushing 4K at 60 fps on a spectral mesh costs more than 1080p at 30 fps on a line spectrum. The renderer is deterministic, so the preview matches the export and you can trade resolution or frame rate to fit your hardware. Export is client-side WebCodecs to MP4 or WebM with no watermark and no quota.
Can I animate a camera move on a depth mode?
Yes, in the Studio Workstation. The beat-aware timeline gives you keyframes and graph curves, so you can animate a camera push, ease it, and pin the move to beat and bar markers. The Classic Editor reaches the same depth through guided geometry and direction controls.
Related workflow
A track to a release-ready visualizer, per platform
Render the visual once, then produce the platform masters from it, instead of re-rendering the whole video for every aspect ratio.
- Render the beat-synced videoNovus Visualizers: Pick the engine and mode against your actual track; the analysis is done on your audio, not on a preset preview.
- Trim or upscale the exportNSS Background Remover: The video utilities handle the tidy-up pass so the render does not have to be repeated to fix ten seconds of it.
- Produce the per-platform mastersNovus Convert: Each destination wants a different container and bitrate; converting the finished render is far cheaper than re-rendering it.
Related troubleshooting
Was this page helpful?
Your answer stays in this browser, it is not sent anywhere and no account or cookie is involved.