2026 · Novus VisualizersAbout 16 min readNovus Stream Solutions
Mixing engines across ordered layers for a signature look
A signature visualizer look rarely comes from one engine. It comes from stacking a calm background engine under a sharp reactive foreground and using blend modes and ranges so the layers complement instead of fight. Here is how ordered layers compose into a style you can reuse across a whole catalog.
Reviewed and updated August 1, 2026. Re-checked against the Novus Visualizers V3 catalog on August 1, 2026. The app now ships ten engines with six modes each, sixty modes in total, so the counts, the engine list, and the mode arithmetic in this article have been corrected. The Logo engine landed after this piece was first published.
Contents
- 1.Overview
- 2.Why a single engine plateaus
- 3.The two-role model: a calm base and a sharp accent
- 4.Choosing a background engine that recedes
- 5.Choosing a foreground engine that punches
- 6.Ordered layers: z-order is composition
- 7.Blend modes: how a layer sits on the one beneath it
- 8.Ranges: giving each layer its own slice of the music
- 9.Output ranges: how far each layer is allowed to move
- 10.Masks and groups: carving instead of covering
- 11.One palette across the whole stack
- 12.Letting the stack evolve over the song
- 13.Turning a stack into a repeatable signature
Overview
A visualizer style that people recognize almost never comes from a single engine turned up loud. It comes from combining engines the way a mix combines instruments: a low bed that fills the frame quietly, and a sharper element on top that carries the accents. Novus Visualizers is built for exactly that. Ten engines, each with six modes, give sixty distinct looks, and in the Studio Workstation any of them can become a layer in an ordered stack. The interesting creative work is not picking the one perfect mode. It is deciding which two or three modes should share the frame, and how they should relate, so the result reads as one intentional image rather than several effects competing for attention.
This post is about that layering strategy, specifically the pairing of a calm background engine with a sharp reactive foreground, and the two tools that keep them from fighting: blend modes and ranges. Blend modes decide how a layer sits on the one beneath it; ranges decide which slice of the music each layer reacts to and how far it is allowed to move. Get both right and the layers complement each other, each doing a job the other cannot. Get them wrong and you have two busy effects strobing over one another. Everything here happens in the Studio Workstation at visualizers.novusstreamsolutions.com/editor, where ordered layers, blend modes, masks, ranges, and keyframes all live.
Why a single engine plateaus
A single mode, however good, has a ceiling. Every engine is designed around one behavior (bars rise, particles scatter, a tunnel rushes, ink diffuses), and once you have tuned its colors, geometry, and audio bindings, you have reached the edge of what that one behavior can express. The frame tends to feel either empty, because the mode leaves large areas untouched, or frantic, because you pushed the single layer to fill the whole image and it now reacts to everything at once. Neither is a signature; both are the default. The mode is doing its one job honestly, and its one job was never meant to be the entire picture on its own.
Combining engines removes the ceiling because you are no longer asking one behavior to carry the whole frame. A slow Bloom filling the background can hold the empty areas a Bars layer leaves bare, while the Bars layer supplies the sharp rhythmic read the Bloom cannot. Each engine keeps doing the one thing it is good at, and the gaps in one are covered by the strengths of another. That division of labor is the whole reason to layer: not to pile on effects, but to assign each engine a role it can fulfil cleanly, so the composite says something no single mode could say alone. A signature look is almost always a relationship between layers, not a single dialed-in effect.
The two-role model: a calm base and a sharp accent
The most reliable starting structure is two layers with opposite temperaments. The background layer is calm: it moves slowly, fills most of the frame, sits at low contrast, and reacts to the broad energy of the track rather than its fine detail. Its job is atmosphere and color, the room the rest of the image lives in. The foreground layer is sharp: it is smaller, higher in contrast, and reacts to transients and the high end, hitting precisely on the beat. Its job is the rhythmic read, the thing the eye locks onto. One is the pad, the other is the lead, and keeping their roles that distinct is what stops them from competing for the same attention.
The reason this pairing works is contrast. If both layers are calm, the frame feels inert and nothing marks the beat; if both are sharp, the frame strobes and the eye has nowhere to rest. Pairing one of each gives the composition a foreground and a background, a subject and a setting, which is how any legible image is built. The viewer reads the calm layer as the environment and the sharp layer as the event, and the two together feel deliberate. Almost every signature style in the app can be described in these terms: what recedes, what punches, and how far apart on that scale the two layers sit. Widen that gap and the look sharpens; narrow it and the look softens.
Choosing a background engine that recedes
A good background engine is one whose default behavior is broad and slow. Bloom modes like Ink Diffusion and Cellular Growth spread across the frame and evolve gradually, which reads as texture rather than motion. Tunnel modes like Corridor Grid and Warp Field give depth and a sense of a space the music is happening inside. Radial Concentric Rings and a filled Waveform give a steady, symmetrical bed. Spectrum Mirrored Area lays a soft band of color along the bottom of the frame. What these share is that they occupy area without demanding attention, which is exactly what a background is for. You are choosing a wash, not a subject, and the mode that fills space quietly is the right tool.
The way you tune the background matters as much as the mode you pick. Pull its contrast and brightness down so it never competes with the foreground; slow any speed or evolution controls so it drifts rather than pulses; widen its shapes so it reads as a field rather than as objects. Bind it to slow, broad signals (overall band energy or the low end) with a deliberately small output range, so it breathes with the music instead of reacting to every hit. A background that reacts too sharply stops being a background; it becomes a second foreground, and the composition loses the layer that was supposed to hold everything else together. Restraint is the entire craft of the base layer.
- Bloom (Ink Diffusion or Cellular Growth): a slow, spreading texture that fills the frame.
- Tunnel (Corridor Grid or Warp Field): depth and a sense of space behind everything.
- Radial (Concentric Rings): a steady, symmetrical bed centered in the frame.
- Spectrum (Mirrored Area): a soft band of color along the lower edge.
- Particles (Starfield): a quiet, wide scatter that never demands attention.
Choosing a foreground engine that punches
The foreground is where reactivity should be obvious. Bars modes (Linear Equalizer, Center Mirror, Radial Bars) give an unmistakable frequency read that the eye instantly connects to the music. Particles Fountain Burst and Trails Comet Shower throw sharp events on transients. Radial Sunburst and Pulse Orb sit centered and pulse hard on the beat. A Waveform Oscilloscope or Lissajous draws a crisp line that dances with the signal. These modes are high-contrast and event-driven by nature, which is what you want on top: the layer that marks time, that the viewer watches to feel the rhythm. Where the background was chosen to recede, the foreground is chosen to lead the eye.
Tune the foreground for precision rather than coverage. Keep it smaller than the background so it sits as a subject inside the frame rather than filling it; raise its contrast so it separates cleanly from the bed beneath; and bind it to fast, specific signals (onsets and the high bands of the 32-band FFT) with a wide output range so its hits are large and unmistakable. The foreground is allowed, even encouraged, to be aggressive, because the calm background is there to absorb that energy and give it somewhere to land. The two tunings are mirror images: the base is wide, slow, and restrained; the accent is tight, fast, and bold. That deliberate opposition is what makes the pair feel composed rather than cluttered.
- Bars (Linear Equalizer, Center Mirror, or Radial Bars): an unmistakable frequency read.
- Particles (Fountain Burst): sharp bursts thrown on transients.
- Trails (Comet Shower): fast streaks that snap on the beat.
- Radial (Sunburst or Pulse Orb): a centered element that pulses hard on the downbeat.
- Waveform (Oscilloscope / Lissajous): a crisp, dancing line locked to the signal.
Ordered layers: z-order is composition
In the Studio Workstation the stack is a list of ordered layers, drawn from the bottom up, with no fixed maximum. The order is not a technicality; it is the composition. The background engine sits at the bottom so everything else draws over it. The foreground sits above so its accents are never buried. If you add a third layer (a mid element, say a thin Trails Flow Field or a Radial Orbit Halo), where you place it in the order decides whether it reads as part of the environment or part of the subject. Dragging a layer up or down the stack changes the image as much as changing its mode does, because it changes what covers what and what shows through.
Thinking in explicit order also keeps the stack legible as it grows. Two layers are easy; four or five need discipline, and the discipline is knowing what role each layer plays and where in the order that role belongs. Name them by job (base, accent, detail, frame) and the stack stays readable weeks later when you reopen the document to make a variant. Groups help here too: related layers can be collected so they move, mask, and blend as a unit. The order is the score, and each layer is an instrument entering at a known place; a stack you can read top to bottom is a stack you can evolve without it turning to mud.
Blend modes: how a layer sits on the one beneath it
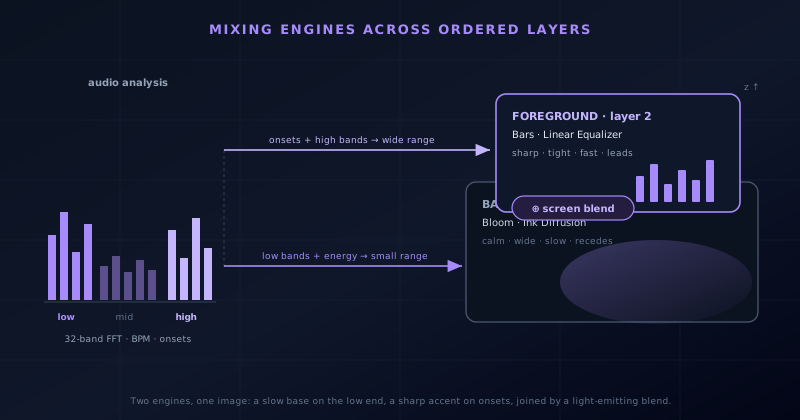
Stacking layers raises an immediate question the order alone cannot answer: when the foreground draws over the background, how should their pixels combine? By default the top layer simply covers what is under it, which wastes the background wherever the foreground is opaque. Blend modes change that combination. An additive or screen blend makes the foreground brighten the background where they overlap, so a Bars or Particles layer appears to glow out of the bed rather than sit on top of it as a flat cutout. That single change is often the difference between a stack that looks like two stickers pressed together and one that looks like a single luminous image.
Different blends do different jobs, and choosing per layer is part of the style. Screen and add are for light: accents, sparks, and highlights that should feel emitted. Multiply and darken are for tint and shadow, pulling a color wash across everything beneath, or letting a texture bite into the image. Overlay and its relatives raise contrast, deepening the darks and lifting the lights so a flat bed gains shape. The move is to pick the blend that makes the foreground belong to the background, not merely obscure it. A layer set to a light-emitting blend interacts with the bed; a layer left on normal just hides part of it. Blend modes are how two engines become one surface.
- Screen / Add: for emitted light, meaning accents, sparks, and highlights that should glow.
- Multiply / Darken: for tint and shadow, meaning a color wash or a texture that bites into the image.
- Overlay: for contrast, deepening the darks and lifting the lights so a flat bed gains shape.
- Normal: for a hard cutout, used only when a layer should genuinely hide what is below.
Ranges: giving each layer its own slice of the music
The second tool that keeps layers from fighting is ranges, and it works on the audio side rather than the visual side. Novus Visualizers analyzes the track as a 32-band FFT plus BPM and onset detection, and every band or event is a signal a binding can read. The mistake that makes layered visualizers feel chaotic is wiring every layer to the same signal (usually overall loudness), so the whole frame pulses together on every sound, which is exactly the muddy, everything-at-once look layering was supposed to avoid. Ranges fix this by assigning each layer a different part of the spectrum, so the layers react to different things and therefore move at different times.
Give the background the low end and broad energy: bind it to the bass bands or the overall envelope so it swells slowly with the body of the track. Give the foreground the high bands and onsets so it snaps on hats, snares, and the sharp starts of sounds. Now the two layers are driven by genuinely different parts of the music, and instead of pulsing in unison they trade off: the bed breathes on the low end while the accent cracks on the transients. The frame gains rhythm because its elements are no longer synchronized to one signal. This mirrors how you hear a mix as separate layers, and it is the single most effective change for making a busy stack feel intentional.
Output ranges: how far each layer is allowed to move
Ranges also refers to how far a signal is allowed to push a parameter: the output range of a binding, its floor and its ceiling. Two layers can read different signals and still fight if both are cranked to their extremes, because two things moving at full amplitude read as equally important. The fix is to give the background a small output range and the foreground a wide one. The base should move subtly (a gentle scale, a slow color drift, a few percent of change) so it never lunges at the viewer. The accent should move a lot (big bursts, hard pulses, dramatic scale) so its hits are unmistakable. The gap in output range is what encodes the hierarchy between the two layers.
Setting floors and ceilings deliberately also prevents the two failure modes at the edges. A background with too high a ceiling spikes into the foreground's territory and the composition flattens; a foreground with too high a floor never rests, so its accents stop reading as accents because there is no quiet to punctuate them. Tuning the ranges is really tuning the dynamics of the image: how loud each layer is allowed to get, and how quiet it returns to. A calm base with a narrow range and a sharp accent with a wide range, each on its own slice of the spectrum, is a stack that keeps its shape through a whole song rather than collapsing into noise at the loud parts.
Masks and groups: carving instead of covering
Blend modes control how layers combine everywhere; masks control where a layer appears at all. In the Studio Workstation a layer can be masked so it only shows through a shape, along a gradient, or within another layer's silhouette. This turns covering into carving. A bright Particles foreground can be masked to a soft circle in the center so it never touches the edges, leaving the background clean at the frame's border. A color wash can be masked to a gradient so it tints the bottom of the image and fades out toward the top. Masking is how you decide the territory of each layer, so the foreground occupies its region and the background keeps the rest.
Groups then let a multi-layer idea behave as one. Collect a base and its two accent layers into a group and you can mask, blend, move, or fade the whole cluster at once, which keeps a complex stack manageable and makes it reusable as a block. A group is also how you build a compound element (a Radial Logo Crown with its own glow and particles) and drop it into other projects intact. Between masks that carve space and groups that bundle layers, the stack stops being a flat pile of effects and becomes an organized composition with regions and components, which is what a recognizable style actually is underneath: a specific arrangement of specific parts in specific places.
One palette across the whole stack
Nothing unifies a layered visualizer faster than a shared, disciplined palette. Two engines with unrelated colors read as two effects no matter how well their motion is balanced; the same two engines drawing from one small set of colors read as a single image. The practical approach is to pick a palette of two or three hues plus a neutral, give the background the desaturated, darker end of it, and reserve the brightest, most saturated hue for the foreground accent. That way the base recedes in muted tone while the accent pops in the signal color, and the eye is drawn to the foreground by color as well as by contrast and motion. Color does half the work of establishing the hierarchy.
Palette discipline is also what makes a look portable across a catalog. If every release you make uses the same restricted set of colors, differently arranged, the videos feel like a family even when the engines underneath change from track to track. This is where a layered approach pays off over a lifetime of posts rather than a single one: the stack and the palette together are your signature, and reusing them (swapping the song, keeping the arrangement) produces a body of work that is instantly identifiable as yours. A background engine, a foreground engine, a blend, a set of ranges, and a palette: fix those five things and you have a style, not just a video.
Letting the stack evolve over the song
A signature look does not have to be static for the whole track. The Studio Workstation's beat-aware timeline, with beat and bar markers, keyframes, and graph curves, lets the arrangement change with the arc of the song. You can keep the background running the entire time but bring the foreground accent in only at the drop, keyframing its opacity or scale up on the downbeat so the sharp layer arrives when the energy does. Clips and loop regions let a layer play only across a section, so a verse and a chorus can carry visibly different stacks while sharing the same base. The layering strategy becomes a small piece of direction rather than a fixed poster.
Graph curves are what make those transitions feel intentional rather than abrupt. Easing a layer in over a bar, ramping a blend's intensity across a build, or slowly widening a foreground's range through a chorus gives the composite a sense of development: the same signature look, revealed and intensified in step with the music. Because the markers are beat-aware, these moves land on musical boundaries instead of arbitrary timestamps, so a layer entering feels like part of the arrangement. Evolving the stack over time is the difference between a loop and a piece: the roles stay fixed, but when each layer speaks changes, and that change is what keeps a three-minute video from wearing out its single frame.
Turning a stack into a repeatable signature
Once a stack works, the goal is to make it reusable, and the app's structure is built for that. Both editors (the guided Classic Editor and the node-based Studio Workstation) share one saved document, so a layered arrangement you build in the Studio is a real, reopenable file, not a one-off render. Duplicate it, swap the track, and you have the next release in your style with minutes of work instead of a rebuild. The stack, the blends, the ranges, and the palette travel together in that document, which is precisely what a signature is: a saved relationship between layers you apply again and again rather than reinvent each time you sit down.
The last piece is trust in the output. Both editors drive one deterministic renderer, so the preview you tuned is the frame you export: the blends, masks, and ranges composite identically in the final file. Export is client-side through WebCodecs to MP4 or WebM up to 4K, with no watermark and no quota, so a layered look does not get flattened, degraded, or stamped on the way out. That means the effort you put into arranging engines across ordered layers is preserved exactly, release after release. A signature style is only worth building if it survives to the finished video intact, and here the thing you compose in the stack is the thing your audience sees.
Frequently asked questions
Quick answers to common questions about this topic.
Can I combine more than one engine in a single visualizer?
Yes. In the Studio Workstation, each engine and mode becomes an ordered layer, so you can stack a calm background engine under a sharp foreground engine. Layers are ordered with no fixed maximum, and the whole stack renders as one image.
What are blend modes for in a layered visualizer?
Blend modes decide how a layer combines with the layers beneath it. A screen or additive blend makes a foreground layer glow into the background instead of sitting on top as a flat cutout; multiply and overlay tint or add contrast. They are how two engines become one surface rather than two stickers.
How do I keep two reactive layers from fighting?
Give each layer its own slice of the music and its own amount of movement. Bind the background to the low bands or broad energy with a small output range so it swells slowly; bind the foreground to onsets and the high bands of the 32-band FFT with a wide range so its hits are sharp. Driven by different signals, the layers trade off instead of pulsing in unison.
Does a layered look still export cleanly?
Yes. Both editors drive one deterministic renderer, so the preview matches the export frame for frame. Export is client-side through WebCodecs to MP4 or WebM up to 4K, with no watermark and no quota, so the composited stack survives intact.
Related workflow
A track to a release-ready visualizer, per platform
Render the visual once, then produce the platform masters from it, instead of re-rendering the whole video for every aspect ratio.
- Render the beat-synced videoNovus Visualizers: Pick the engine and mode against your actual track; the analysis is done on your audio, not on a preset preview.
- Trim or upscale the exportNSS Background Remover: The video utilities handle the tidy-up pass so the render does not have to be repeated to fix ten seconds of it.
- Produce the per-platform mastersNovus Convert: Each destination wants a different container and bitrate; converting the finished render is far cheaper than re-rendering it.
Related troubleshooting
Was this page helpful?
Your answer stays in this browser, it is not sent anywhere and no account or cookie is involved.