2026 · NSS Background RemoverAbout 16 min readNovus Stream Solutions
Marketplace product photos that convert, made in the browser
A repeatable, on-device workflow for clean, consistent product cutouts across Amazon, Etsy, and Shopify: choose a removal mode, refine the edge and decontaminate the halo, place the cutout on a clean background, and export straight-alpha. No upload, no account.
Contents
- 1.Overview
- 2.Why a consistent grid converts
- 3.Decide the target before you touch a photo
- 4.Choosing a removal mode: Fast, Best Quality, or Glass
- 5.Read the first cutout before you fix it
- 6.Refining the edge: brush, wand, and edge refine
- 7.Decontaminating the halo
- 8.Placing the cutout on a clean background
- 9.Exporting straight-alpha for every destination
- 10.The pipeline at a glance
- 11.Consistency across a whole catalog
- 12.Private and free, because it runs on your device
- 13.Where to go next
Overview
A product listing gets a fraction of a second to look trustworthy, and the image does most of that work before a single word is read. On Amazon, Etsy, and Shopify the photos that convert are not the most artistic ones; they are the clean, consistent ones: the same crop, the same background, the same framing from one SKU to the next, so a shopper reads a grid of thumbnails as a real shop rather than a pile of snapshots. The fastest way to get there is rarely a studio reshoot. It is a repeatable cutout workflow: separate the product from whatever it was photographed against, clean the edge, and place it on a background you control.
This guide walks that workflow end to end in the NSS Background Remover, which runs entirely in your browser. You choose a removal mode, refine the edge and decontaminate any color halo, drop the cutout onto a clean background, and export straight-alpha so a single asset works on every destination. Nothing uploads and nothing needs an account: the AI model runs on your own device, so a folder of unreleased product shots never leaves your machine. The point of the whole exercise is repeatability: once the steps are set, every SKU passes through the same short pipeline and the catalog comes out even instead of improvised.
Why a consistent grid converts
Marketplace search results and category pages are grids of small images, and shoppers scan them the way they scan a shelf: pattern first, detail second. When every thumbnail shares a background, a fill percentage, and a viewing angle, the eye moves smoothly across the row and the products read as a coherent line. When backgrounds jump from white to a cluttered desk to a gray gradient, each image fights its neighbors and the grid looks thrown together. Consistency is not a cosmetic preference. It is what lets a browsing shopper compare products instead of being distracted by the photography, and comparison is the moment a purchase decision actually starts to form.
The platforms encode this into their rules. Amazon's main image expects a pure white background and the product filling most of the frame, precisely so its grid stays uniform across millions of listings. Etsy and Shopify give sellers more freedom, but that freedom is a quiet trap for anyone building a professional storefront: without a self-imposed standard, a shop's own photos drift over months of adding SKUs. A cutout workflow supplies the discipline the platform will not enforce for you: it lets you decide the background, the margins, and the framing once, then apply that same decision identically to product one and product four hundred.
Decide the target before you touch a photo
A repeatable pipeline starts with a target you write down once. Before removing a single background, settle on what the listing needs: the pixel size, the aspect ratio, the background, and the file format. At the time of writing, Amazon's main image wants a pure white background (RGB 255,255,255), the product occupying roughly 85 percent of the frame, and a longest side of at least 1000 pixels, or 1600 and up to enable the hover-zoom that helps conversion. Etsy rewards larger images, commonly around 2000 pixels on the long edge, and is relaxed about the background itself. Shopify listings look most professional as a consistent square. These specs change, so confirm the current official requirement for your destination.
Once you know the target, the cutout stops being an open-ended edit and becomes a step toward a fixed spec. That is the difference between fiddling with one image and running a workflow. Decide, for example, a 2000-pixel square, pure white, product at 85 percent, PNG for the layered version and JPG for the flat main image, and now every product has the same finish line. The target also tells you what the removal is for: an image destined for white needs a clean, halo-free edge, while a cutout you plan to drop into a lifestyle scene needs genuine transparency so it composites without a seam. Set the target first and most of the tool choices below simply fall out of it.
- Amazon main image: pure white (255,255,255), product about 85% of the frame, longest side 1000px+ (1600px+ for zoom), usually JPG.
- Etsy: larger is better (commonly around 2000px+), flexible on background, square and portrait both common.
- Shopify: a consistent square across the whole catalog (for example 2048x2048) reads most professionally.
- Decide format up front: straight-alpha PNG for anything you will composite; flattened JPG on white where transparency is not needed.
- Always verify the current, official spec for each marketplace before running a large batch.
Choosing a removal mode: Fast, Best Quality, or Glass
The Background Remover offers three removal modes, and picking the right one per product saves more time than any amount of manual cleanup afterward. Fast, powered by the RMBG-1.4 model, is the everyday choice: for a well-lit product on a plain-ish background (a shoe, a box, a mug, a tote bag) it produces a clean cutout in seconds and rarely needs a second pass. Best Quality, powered by RMBG-2.0 (a BiRefNet-based bilateral reference network), is the mode for difficult subjects: fuzzy textures, thin straps and cords, intricate jewelry, or a product photographed against a busy scene. It is slower to run but far more forgiving of the fine detail that Fast would clip or blunt.
Glass mode is the specialist. Transparent and semi-transparent products (bottles, glassware, eyewear, acrylic, cellophane packaging) break ordinary background removal, because a naive cutout either deletes the see-through areas or keeps a ghost of the old background trapped inside them. Glass mode is tuned to preserve that transparency, so a perfume bottle stays a perfume bottle rather than collapsing into a solid silhouette. The practical rule is simple: reach for Fast first, escalate to Best Quality when edge detail matters, and switch to Glass whenever you can see through the product. Because every mode runs on your device, trying a second one costs nothing but a few seconds, so compare when a result looks even slightly off.
- Fast (RMBG-1.4): quick, dependable cutouts for well-lit products on simple backgrounds.
- Best Quality (RMBG-2.0 / BiRefNet): fine detail, wispy or intricate edges, and busy backgrounds.
- Glass: transparent and reflective products (bottles, glassware, eyewear, acrylic) where see-through areas must survive.
- Switching modes is free and local; compare two on a tricky product instead of hand-repairing a weak cutout.
Read the first cutout before you fix it
Resist the urge to start brushing the moment the background disappears. The first thing to do with any cutout is read it at 100 percent against the checkerboard, because the checkerboard is genuine transparency (the same pattern Photoshop shows for a real alpha channel) and it reveals exactly where the model succeeded and where it struggled. Zoom to the edges an AI model finds hardest: the boundary between a dark product and a dark background, thin protrusions like handles and straps, and any soft or fuzzy material. Note the specific problem areas rather than reworking the whole mask. Most product cutouts come out of the model already 90 percent correct, and your job is the remaining tenth, not a rebuild.
Three failure patterns show up repeatedly on product photography. Low-contrast edges (a charcoal bag on a gray backdrop) get eaten or left ragged because the model cannot clearly see where one thing ends and the other begins. Fine detail like frayed fabric, chain links, or bristles gets simplified into a blunt outline. And reflective or transparent surfaces pick up a faint tint of the old background, the halo problem the next sections address in full. Naming which of these you are actually looking at tells you which tool to reach for: a wrong overall shape is a job for the brush and wand, a slightly hard edge is a job for edge refine, and a color tint is a job for decontamination.
Refining the edge: brush, wand, and edge refine
The refine tools are a finishing pass, not a from-scratch masking workflow; you are correcting a good mask, not building one from nothing. The brush paints the subject back in or erases stray background by hand, which is the direct fix when the model clipped a handle or left a scrap of the old scene behind. The wand selects a contiguous region by similarity, so a patch of background the model missed inside a bag's opening, or a shadow it mistook for product, can be removed in a single click rather than painted out stroke by stroke. Work zoomed in, in short strokes, and toggle the view so you can judge the edge against both the checkerboard and a solid color.
Edge refine is the tool that makes a cutout look photographed rather than cut out. A hard, aliased boundary reads as pasted-on, while a slightly feathered, contamination-free edge sits naturally on any background. Edge refine tightens and smooths that boundary and softens the transition just enough to match how the product actually met the light, without blurring away real detail. On a well-lit product the entire refine pass is a few strokes and one edge adjustment; on a fuzzy or intricate subject it is where most of your minute per image goes. The goal is not a mathematically perfect selection but an edge that survives being placed onto white and onto a colored scene without ever betraying the cut.
- Brush: paint the subject back in or erase leftover background by hand for shape corrections.
- Wand: select and remove a contiguous region (a missed background patch or a mistaken shadow) in one click.
- Edge refine: tighten, smooth, and lightly feather the boundary so the edge reads as photographed, not pasted.
- Work at 100%, in short strokes, checking the edge against both the checkerboard and a solid color.
Decontaminating the halo
The halo is the subtlest and most damaging defect in a product cutout, and the one that separates an amateur result from a clean one. When a product is photographed against a colored background, the pixels right at its edge are a blend of product and background color: a bright red backdrop leaves a faint pink rim on a white sneaker, a green surface leaves a green fringe along fur or fabric. Cut that edge out as it is and the contaminating color travels with the subject, so when you later place the cutout on white the old background whispers around every edge. Decontamination is the step that removes that inherited tint before it can follow the product anywhere.
The Background Remover's decontamination replaces the color of edge pixels with an estimate of the product's true color while preserving their transparency, so the rim stops carrying the backdrop and starts matching the subject it belongs to. This matters most exactly where marketplaces care most: a main image on pure white is where a stray colored fringe is most visible and most damaging. Decontaminate before you place the cutout, then re-check the edge on both a white and a mid-gray background, because a halo that hides on white often reappears on gray, and the reverse happens too. Combined with edge refine, decontamination is what lets a straight-alpha cutout drop onto any background with no cleanup, which is the entire promise of the export.
Placing the cutout on a clean background
With a clean, decontaminated cutout you now control the background completely, which is the freedom a raw photo never gives you. For a pure-white main image, the simplest path is the add-background utility in the tools area: it fills the transparent region with a solid color (white for Amazon, or a brand color for a category page) and hands back a flat image at the size you set. Because the cutout is straight-alpha, the fill sits behind the product with no dark seam at the edge, which is the concrete payoff for decontaminating first. Set your target dimensions here so every product lands at the same size, on the same fill, framed the same way.
When a listing wants more than a plain color, the image editor is the next step up. It composites the cutout as a layer over a background (a soft studio gradient, a surface, or a full lifestyle scene) with blend modes, 22 filters, and color grading to match the product to the light of the scene it now sits in. A common, high-converting pattern is a main image on white plus secondary images of the same cutout staged in context, all built from a single clean cutout rather than a second photoshoot. Add a soft, natural contact shadow beneath the product in the editor and even a flat white image gains the grounded look that keeps it from appearing to float above nothing.
Exporting straight-alpha for every destination
Export is where the workflow either pays off or quietly leaks. The Background Remover writes true straight-alpha PNGs (non-premultiplied transparency) which is the technically correct format and the reason these cutouts composite cleanly in Photoshop, Figma, and marketplace tooling without the dark or white fringing that most free tools leave behind. Keep the straight-alpha PNG as your master asset: it is the version you can drop onto white today, a brand color tomorrow, and a lifestyle scene next week without ever re-cutting the product. Treat it as the source from which every listing-specific image is derived, rather than exporting a disconnected one-off per marketplace and losing the thread.
From that single master, produce what each destination needs. Where a marketplace requires a flat white main image and cares about file size (Amazon's JPG main image is the classic case) flatten the cutout onto white and export JPG, since JPG has no alpha channel and would otherwise fill the transparent area with a solid color anyway. Where you will composite or need transparency, keep PNG, or WebP for a smaller file that still supports alpha. If the source photo is too small, the AI upscaler can enlarge the cutout 2x or 4x on-device to clear a platform's minimum resolution before you flatten. One master, several exports, and every one of them traceable straight back to the same clean cut.
- Master: straight-alpha PNG (or WebP), the reusable, halo-free source for every background.
- Amazon-style flat main image: composite on white, export JPG for a smaller file.
- Lifestyle or brand-color images: keep transparency, composite in the image editor.
- Below a platform minimum size? Upscale 2x/4x on-device before flattening.
The pipeline at a glance
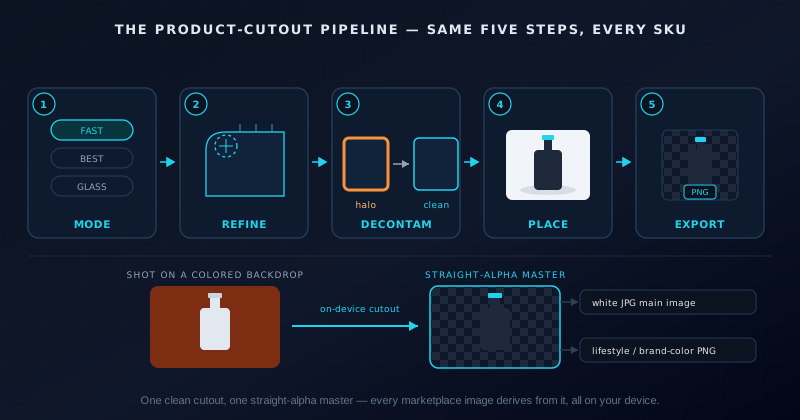
Put together, the workflow is five decisions made in the same order every time: choose a mode, read and refine the edge, decontaminate the halo, place the cutout on your target background, and export from a straight-alpha master. The value is not any single step but the fixed sequence: because the order never changes, the workflow becomes muscle memory, and a product that used to take fifteen minutes of manual masking takes closer to a minute. The fixed order also makes results predictable: when a cutout comes out wrong, you know which station failed, so you adjust that one decision rather than starting over on the whole image from scratch.
The sequence is also what keeps a whole catalog consistent. Each SKU passes through identical stations, so the variables that make a grid look professional (background, fill percentage, edge treatment, size) are set once and repeated instead of re-decided per photo. Diagramming it this way exposes where the time actually goes: nearly all of it lives in reading and refining the edge, while mode choice, decontamination, placement, and export are quick, near-automatic steps. That is the honest shape of product-photo work (a little judgment at the edge, then a repeatable finish) and it is why a browser tool with no upload and no account can replace a surprising amount of studio busywork.
Consistency across a whole catalog
A single clean cutout is a small win; a catalog that looks like one shop is the actual goal. The workflow scales precisely because the decisions are already fixed: the same target size, the same background, the same fill and framing, applied to every product in turn. Establish a naming convention up front (a stable SKU stem plus an index, like nvs-mug-blk-01 and nvs-mug-blk-02) so the main image and its alternates sort together and re-export predictably. When you re-shoot or add products later, run them through the identical pipeline and they slot into the existing grid without a visible seam between the old photography and the new.
When the volume grows, keep the decisions at the batch level rather than the image level. Process products in chunks, export each chunk before starting the next so a long session never risks losing work, and triage results into pass, quick-fix, and reshoot instead of trying to perfect every image in a single pass. If a particular category keeps needing the same repair (say every glossy item shows a halo) that is a signal to change the shoot, with a matte surface or a different backdrop, rather than to keep repairing pixels forever. The catalog stays even because the standard lives in the workflow, not in your memory of how you happened to edit the last one.
Private and free, because it runs on your device
Every step above happens in your browser. The AI models download once and are cached, then the cutout, the refine tools, decontamination, the editor, upscaling, and the utilities all run on your own hardware: no image is uploaded, no account is required, and there is no per-image credit or export watermark. For product photography that matters more than it first appears: unreleased SKUs, licensed imagery, and shots under embargo are exactly the files a small team should not be pushing to an unknown server, and a client-side tool removes that decision entirely, because there is simply no server-side copy to worry about, retain, or leak.
The privacy is structural rather than a policy you have to trust, and you can confirm it yourself in the browser network tab: after the one-time model download there is no request carrying your image off the device. The same architecture is what keeps the tool free and unlimited: because your device does the processing, there is no per-image server cost to recover, so there is no quota quietly pushing you toward a subscription when you run a four-hundred-item catalog. For anyone managing listings across Amazon, Etsy, and Shopify, that combination (private by construction, free at any volume) is what makes a repeatable cutout workflow practical to actually adopt and keep.
Where to go next
The fastest way to internalize the workflow is to run one product all the way through it: open the Background Remover, drop in a photo, pick a mode, and take it to both a straight-alpha PNG and a flat white JPG. For a hands-on, click-by-click version aimed specifically at Amazon, Etsy, and Shopify, the marketplace product-photos tutorial walks the same steps on real images, and the tool map lays out every cutout mode, editor, and utility the pipeline touches. When you are ready to scale beyond a handful of items, the batch guide covers running a full catalog as a single local job.
For the technical reasons these cutouts behave so well downstream, the straight-alpha explainer is worth a read; it is why the exports composite without halos in Photoshop, Figma, and marketplace tooling. And when a listing needs more than a plain background, the image editor is where a cutout becomes a staged, in-context image with layers, blend modes, and filters. Every one of these runs in the same browser, on the same on-device model, with no upload and no account, so the workflow you set up for a single product is already the workflow for your entire storefront.
Frequently asked questions
Quick answers to common questions about this topic.
What background do marketplaces want for product photos?
Amazon's main image expects a pure white background (RGB 255,255,255) with the product filling most of the frame; Etsy and Shopify are more flexible but reward consistency across a catalog. The safest approach is to export a straight-alpha PNG master, then drop the same cutout onto white, a brand color, or a lifestyle scene as each listing needs. Always confirm the current spec for your destination.
Which removal mode should I use for products?
Use Fast (RMBG-1.4) for well-lit products on simple backgrounds, Best Quality (RMBG-2.0 / BiRefNet) for fine detail and busy backgrounds, and Glass for transparent or reflective products like bottles, glassware, and eyewear. Switching modes runs locally and costs only a few seconds, so it is worth comparing two on a difficult product.
Do my product photos get uploaded anywhere?
No. The AI model downloads once and then everything (the cutout, edge refinement, decontamination, the editor, upscaling, and the utilities) runs on your own device in the browser. There is no upload, no account, and no server-side copy of your images, which you can confirm in the browser network tab.
Should I export JPG or PNG for a listing image?
Keep a straight-alpha PNG (or WebP) as your reusable master for anything you will composite or that needs transparency. Where a marketplace requires a flat white main image and file size matters, flatten the cutout onto white and export JPG, since JPG has no alpha channel of its own.
Related workflow
Product photo to a transparent image every channel accepts
One photograph, cut out once, then re-encoded for a storefront, a marketplace listing and a social post without redoing the cutout each time.
- Cut the background out and check the edgesNSS Background Remover: Hair, glass and drop shadows are where automatic cutouts fail. Fix them once, on the master, before anything downstream copies the mistake.
- Re-encode and resize per destinationNovus Convert: Transparency survives PNG and WebP and dies in JPEG. Convert validates the file it hands back, so a listing never rejects a silently broken upload.
Related troubleshooting
Was this page helpful?
Your answer stays in this browser, it is not sent anywhere and no account or cookie is involved.