2026 · NSS Background RemoverAbout 13 min readNovus Stream Solutions
Edge quality in AI cutouts: hair, fur, and fine detail
Everyone judges a background remover the same way: they zoom into the hair. Fine detail is where cutouts are won or lost, and the outcome is decided by more than the model: the photo you feed it, the order of your refinement passes, and knowing when a reshoot beats another round of edge surgery.
Contents
- 1.Why hair is the hardest pixel in a cutout
- 2.Binary masks and alpha mattes look different at 400%
- 3.The photo decides more than the model does
- 4.A refinement pass with an order of operations
- 5.Color spill is not a mask problem
- 6.Accept, refine, or reshoot: the sixty-second call
- 7.Compositing without fringes
- 8.Training your eye
Why hair is the hardest pixel in a cutout
Zoom into the boundary of any photographed subject and the clean line your eye reports turns out not to exist. A strand of hair might be two pixels wide, and a pixel at its edge is not "hair" or "background"; it is a blend, light from both averaged together by the camera sensor. Fur, wool fibers, frayed denim, feathers, the fuzz on a peach: all of them produce a boundary zone where thousands of pixels are partially subject and partially scene. A cutout tool has to decide what to do with every one of those mixed pixels, and that decision is nearly the whole difference between an edge that looks photographed and an edge that looks scissored.
This is why hair became the universal benchmark for background removal, and why it deserves to be. A tool can look flawless on a coffee mug (hard silhouette, no mixed pixels to speak of) and then produce a helmet-like crop on the same person’s portrait. Whatever a remover does with the easy interior of a subject is table stakes; the boundary zone is the actual test. When people say a cutout looks "AI-ed," a bad boundary zone is almost always what they are reacting to, even if they cannot name it.
The encouraging part is that edge quality is not a lottery. It is governed by three things you can reason about: whether the tool produces a true alpha matte or just a mask, what the source photo gave the model to work with, and how you refine and composite the result. This piece takes each in turn, in the order they actually matter, which, uncomfortably for software people, puts the photograph first and the software second.
Binary masks and alpha mattes look different at 400%
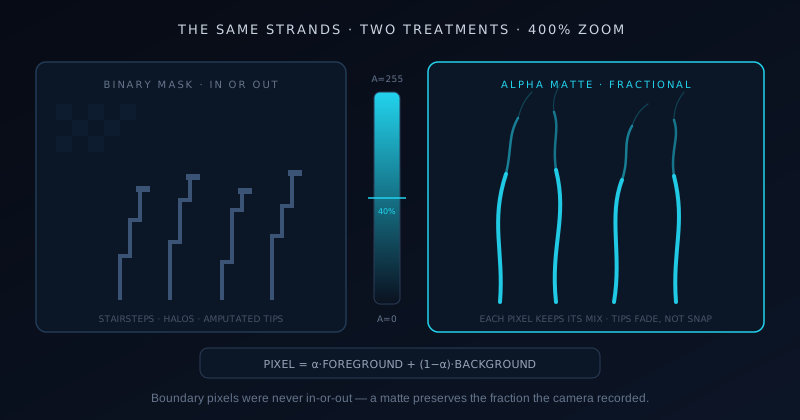
A binary mask answers one question per pixel: in or out. Every pixel is either fully kept or fully deleted, and the mixed pixels of the boundary zone get forced to one side or the other. At normal viewing size the result can pass; at 400% the edge is a staircase, and on hair it is a catastrophe: each strand either fattened by a rind of clinging background or amputated to a hard stub. Halos and chopped hair are not two different failures. They are the same failure, a binary decision applied to pixels that were never binary, erring in opposite directions.
An alpha matte answers a better question: how much of this pixel is subject? Each pixel gets a fractional opacity from 0 to 255, so a strand-edge pixel that was 40% hair keeps 40% opacity and lets 60% of whatever you composite behind it show through. This mirrors how the pixel was formed in the first place: the compositing equation that rebuilds the image, foreground times alpha plus background times one-minus-alpha, is the same blend the camera performed optically. A matte does not draw a line through the boundary zone; it preserves the zone itself. The end-to-end pipeline that produces this matte on-device is laid out at How in-browser background removal works, end to end if you want the machinery underneath.
The practical test takes ten seconds. Cut out a portrait, zoom deep into the flyaway hair against the transparency checkerboard, and look at the strand edges. A gradient of partial transparency fading along each strand means you have a matte. A crisp jagged border, every pixel fully on or fully off, means a mask, and no amount of downstream skill fully rescues a masked edge, because the information about how mixed each pixel was has already been thrown away.
Worth knowing: many tools sit between the two poles. A common shortcut is a binary mask with a blur applied afterward, which produces soft-looking edges that fall apart under scrutiny: the softness is uniform, smearing hard silhouette and fine strand alike, instead of following the actual structure of the boundary. True matting is structural: opacity varies strand by strand, pixel by pixel, because it was estimated from the image rather than painted on as a finishing filter. The blur-mask hybrid passes the ten-second test at a glance and fails it at 400%, which is exactly why the zoom matters.
The photo decides more than the model does
After enough portraits, a pattern becomes impossible to ignore: the same model, the same settings, wildly different edge quality, and the variable is the photograph. Matting is an estimation problem, and estimation runs on evidence. A photo where hair meets a clean, contrasting, evenly lit background hands the model abundant evidence about which light belongs to the strand and which to the scene. A photo where dark hair crosses a dark doorway, or wind-blown strands lie against foliage, offers almost none, and the model’s guess degrades exactly where guessing is hardest.
Resolution is evidence too, in a way people underrate. A strand that is four pixels wide at high resolution carries a visible core and a soft edge the matte can model; the same strand at a quarter of the resolution is a single ambiguous pixel. When a shoot is under my control, I shoot at the camera’s full resolution and frame slightly wide, leaving air around the head rather than cropping tight; strands that exit the frame become edge artifacts by definition, since the model can never know what they did outside it.
None of this requires studio gear. It requires intention at capture time, which costs nothing and cannot be added afterward by any tool. When the cutout is the known destination for a photo, the checklist below is what I actually run through the viewfinder before pressing the shutter.
- Put distance between subject and background: a meter or more softens the background and kills shared shadows.
- Choose a background tone that disagrees with the hair: mid-gray behind dark hair, deeper tones behind blond.
- Avoid visual clutter in the boundary zone; a plain wall beats a bookshelf every time hair is involved.
- Add a rim or back light if you can: a lit silhouette line is the strongest edge evidence a model gets.
- Shoot at full resolution and frame wide enough that no important strands leave the frame.
- Skip heavy in-camera or app sharpening; sharpening halos sit exactly where the matte needs honest pixels.
A refinement pass with an order of operations
Refinement goes wrong when it starts local. The instinct is to zoom straight to the worst strand and start brushing, but per-strand surgery on an edge whose global character is off means redoing the surgery after every global change. So the pass has an order: judge the whole edge first, apply the one global adjustment it needs, and only then spend manual attention on the two or three places that remain wrong. Global first, local second, and the local list gets dramatically shorter after a correct global move.
The global toolkit is small. If the entire silhouette carries a thin bright rind (the matte was slightly generous everywhere), a uniform edge contraction of a pixel or two clears it in one operation. If the edge is clean but reads brittle against a new background, a sub-pixel feather softens the transition; on hair, restraint matters, because feathering past a pixel starts erasing the strand structure the matte worked to keep. If strands survived but carry the old background’s color, that is spill, which is the next section’s problem and no amount of mask adjustment will fix it.
Local work is where the restore brush earns its place. A matte will sometimes drop a whole lock of fine hair (the model judged it background), and painting the alpha back in from the original image recovers it in a few strokes. The workflow, brush sizes, and zoom discipline are demonstrated properly at Edge refinement: getting a perfect transparent background, and the companion piece at Cutting out hair and fur cleanly works a full portrait and a pet photo end to end. My only addition to those tutorials is a time rule: local refinement past ten minutes on one image means the source photo is the problem, and the honest fix is discussed two sections down.
One habit upgrades every refinement session: audit against more than the checkerboard. The checkerboard pattern hides subtle halos surprisingly well because its own texture camouflages edge noise. Toggle the preview background to solid white, then solid black, then something mid-toned. An edge that holds up across all three is actually clean; an edge that only looks clean on the checkerboard is an unexploded surprise waiting for whatever background the cutout lands on.
Color spill is not a mask problem
There is a failure that looks like a bad matte and is not: the strands are all present, the alpha is beautifully graduated, and the hair still glows faintly green, or blue, or whatever color the old background was. That is spill: the original scene’s light reflected off the subject and bounced into the semi-transparent boundary pixels. The alpha channel controls how transparent those pixels are, but their color values still remember the room they were photographed in. Composite them over a new background and the memory shows as a colored fringe.
Because spill lives in the color channels rather than the alpha channel, mask tools cannot touch it: contracting the edge just amputates good strands while the surviving ones stay tinted. The correct fix is color decontamination: replacing the color of boundary pixels with color pulled inward from the solid subject, while leaving their alpha untouched. A strand pixel keeps its 40% opacity but swaps its greenish remembered color for the hair’s actual brown. Done well, decontamination is invisible; the strand simply stops advertising where it used to live.
Diagnosing which problem you have takes one look with the right question. Fringe that is lighter or darker than the hair, hugging the silhouette like a halo, is an alpha problem: the matte kept pixels it should have faded. Fringe that is a different hue than the hair is spill: the matte is fine and the color needs cleaning. Telling them apart matters because the fixes are opposites: one adjusts transparency, the other repaints color, and applying the wrong one degrades an edge that was halfway to clean.
Accept, refine, or reshoot: the sixty-second call
Every cutout deserves a verdict before it gets an effort budget, and the verdict should take about a minute. Accept means the edge is clean at the size and use it is destined for. Refine means specific, nameable defects (a halo here, a dropped lock there) that global-plus-local work will clear in minutes. Reshoot means the source photo failed the matte in a way software cannot recover: hair indistinguishable from background across a wide region, boundary detail destroyed by compression or low resolution, strands cropped mid-air by the frame. The skill is not fixing images; it is sorting them fast and honestly.
Destination size should weigh heavily in the verdict, because most edge defects are invisible at most viewing sizes. A cutout landing in a 400-pixel web card can carry flaws that would disqualify it from a printed banner, and refining pixels the final render will average away is effort spent on nobody. I judge at the destination size first, and only zoom to 400% when the image is bound for large formats. Perfectionism at irrelevant zoom levels is the most common way careful people waste hours on catalog and content work.
When a reshoot is possible, it is almost always cheaper than heroic refinement: the checklist from earlier turns a failing photo into a passing one in two minutes at the camera. When it is not possible (the event is over, the photo is the only one) then heroic refinement is legitimately the job, and knowing the restore-and-decontaminate toolkit deeply is what makes it survivable. The mistake is defaulting to heroics when a better source photo was thirty seconds away all along.
The verdict habit changes how you shoot, which is its quiet second benefit. Once you have sorted a few hundred cutouts, you start seeing the future matte through the viewfinder: noticing the dark doorway behind the dark hair before the shutter fires, stepping the subject a meter forward without thinking about it. The feedback loop between judging edges and framing photos is the real skill this work builds, and it eventually makes the reshoot bucket nearly empty because the failures stop being taken in the first place.
Compositing without fringes
A clean matte can still be ruined at the last step. The classic failure is exporting with premultiplied alpha into a pipeline expecting straight alpha: every semi-transparent strand pixel gets its color darkened by the multiplication, and the composite grows a gray rim that no one can un-refine because it is baked into the math, not the mask. The Background Remover exports straight alpha specifically to dodge this, and the full explanation (including why so many tools get it wrong) lives at Straight alpha vs premultiplied alpha: the export detail that breaks other tools. If a perfect-looking cutout fringes the moment it lands in another app, suspect the alpha convention before you suspect the matte.
The destination background sets the difficulty of the composite. Drop a cutout onto a background whose brightness resembles the original scene’s and the boundary pixels blend forgivingly, because the light they blended with was similar. Move a portrait matted from a bright room onto near-black and every slightly generous boundary pixel lights up as a visible rim. For dark destinations I bias the edge tighter and run decontamination even when the checkerboard looked fine: the checkerboard is mid-toned, and mid-tones forgive what black exposes.
The last percent of realism comes from remembering that objects in scenes interact with them. A subject pasted onto a clean background with no ground contact reads as floating even when the edge is flawless. A soft shadow under the contact points, a whisper of background color graded into the subject’s shadows: these are thirty-second effects in the editor after export, and they buy more believability than another hour on the strands. Edges get a composite to plausible; light is what gets it to real.
Training your eye
Edge judgment is a learnable perception skill, and it develops fastest with deliberate comparison. Take one difficult portrait and produce three versions: the raw automatic matte, a refined pass, and (if you can stage it) a reshoot with the source-photo checklist applied. Composite all three onto white, black, and a busy photograph. The differences you can see and name after that exercise become the checklist you carry into every future cutout, and the exercise costs one evening.
Build a small reference folder of your own worst cases: the doorway portrait, the black cat on the dark sofa, the wind-blown hair against trees. Rerun them occasionally (after tool updates, after your technique improves) and keep the old outputs. The folder does two jobs: it shows you concretely what better looks like, and it inoculates you against marketing, because you evaluate every claim about edge quality on your own known-hard images instead of a demo’s hand-picked ones.
And keep the standard tied to the destination, not to the zoom level. The question is never whether an edge survives 400% inspection; it is whether the person seeing the image at its real size, in its real context, believes the subject was photographed there. Hair and fur are where that belief is won. Spend your attention on the boundary zone in proportion to how much of it the final image actually shows, and edge quality stops being a mystery and becomes a budget, one you now know how to spend.
Frequently asked questions
Quick answers to common questions about this topic.
Why does hair look chopped or helmet-like in AI cutouts?
Because the tool made a binary decision on pixels that were never binary. Hair-edge pixels are blends (partly strand, partly background), and a mask that forces each one fully in or fully out either amputates strands into a hard helmet line or fattens them with a rind of leftover background. The fix is a tool that produces a true alpha matte, where each boundary pixel keeps fractional transparency matching how mixed it actually was. Zoom into a cutout’s flyaway strands: a soft gradient means matte, a jagged staircase means mask.
What is alpha matting in background removal?
Alpha matting estimates a per-pixel opacity between 0 and 255 instead of a hard in-or-out mask. A pixel that was 40% hair and 60% background keeps 40% opacity, so whatever you composite behind it shows through at the right strength, the same blend the camera performed optically when it captured the mixed pixel. This preserves strands, fur, and other fine structure through the boundary zone. It matters because the compositing equation used everywhere downstream multiplies color by that alpha; give it honest fractions and edges look photographed rather than scissored.
How do I fix a colored fringe around a cutout?
First diagnose which fringe you have. A rim that is lighter or darker than the subject is an alpha problem (the matte kept pixels it should have faded), and a small uniform edge contraction usually clears it. A rim that is a different hue (greenish, bluish) is color spill: reflected light from the original background stored in the color channels, which no mask adjustment can touch. Spill needs color decontamination, which repaints boundary-pixel color from the subject inward while leaving transparency alone. Applying the wrong fix makes things worse, so look before you adjust.
Can I recover hair strands the AI deleted?
Often, yes. If the strands exist in the original photo, a restore brush that paints alpha back in from the source recovers dropped locks in a few strokes; the model’s verdict is a starting point, not a sentence. What cannot be recovered is detail the photo never captured: strands lost to low resolution, heavy compression, or a background so similar in tone that even your eye cannot trace them. That is the line between a refine job and a reshoot, and learning to spot it within the first minute saves more time than any brush technique.
When should I reshoot instead of refining the cutout?
Reshoot when the photo failed the matte structurally: hair merging into a same-tone background over a wide region, boundary detail destroyed by compression, or strands cropped by the frame. Those defects sit below what refinement can reach, and software time spent on them is slower and worse than two minutes at the camera with more subject-background separation, a contrasting backdrop, and full resolution. Refine when defects are local and nameable: one halo, one dropped lock. My working rule: if local repair passes ten minutes on a reshootable image, stop and reshoot.
Related workflow
Product photo to a transparent image every channel accepts
One photograph, cut out once, then re-encoded for a storefront, a marketplace listing and a social post without redoing the cutout each time.
- Cut the background out and check the edgesNSS Background Remover: Hair, glass and drop shadows are where automatic cutouts fail. Fix them once, on the master, before anything downstream copies the mistake.
- Re-encode and resize per destinationNovus Convert: Transparency survives PNG and WebP and dies in JPEG. Convert validates the file it hands back, so a listing never rejects a silently broken upload.
Related troubleshooting
Was this page helpful?
Your answer stays in this browser, it is not sent anywhere and no account or cookie is involved.