2026 · NSS Background RemoverAbout 13 min readNovus Stream Solutions
Batch background removal for large product catalogs
Cutting out one product photo is a thirty-second job. Cutting out four hundred is a production line, and the line is only as good as its most boring parts: a shoot the AI mask can rely on, batches sized to your machine, a ruthless QC pass, and filenames a marketplace upload will not choke on.

Contents
- 1.Overview
- 2.Shoot for the mask, not for the eye
- 3.Contrast decisions that pay off four hundred times
- 4.What a browser batch really costs in memory
- 5.Chunking: the run size your machine can hold
- 6.The QC pass: triage, not perfection
- 7.Fixing the fix bucket
- 8.Filenames and folder discipline
- 9.Marketplace specs before you export, not after
Overview
Removing the background from a single product photo is one of the most solved problems on the internet: drop the file in, watch the subject pop free, download a transparent PNG. Removing the background from a four-hundred-SKU catalog is a different job entirely, and the difference is not the AI; it is everything around the AI. When I processed my first real catalog through the Background Remover, the cutouts themselves took an afternoon. The rework caused by an inconsistent shoot, a crashed tab full of unsaved results, and a folder of files named IMG_4club7.png took the rest of the week.
That week taught me to treat catalog work as a production line with five stations: the shoot, the batch run, the quality pass, the naming step, and the marketplace export. Each station has one purpose: to make the next station boring. A consistent shoot makes the mask predictable. A right-sized batch keeps the browser alive. A triage-style QC pass keeps you from polishing pixels nobody will see. Disciplined filenames make the upload a drag-and-drop instead of a matching puzzle. And knowing the size specs before you export means you export once.
This guide walks the line station by station, with the numbers I actually use: how many images per run on how much RAM, what a decoded photo really costs in memory, which SKUs to flag as hard cases before the batch starts, and the pixel dimensions each major marketplace wants. None of it is glamorous. All of it is the difference between a catalog that ships this week and one that ships eventually.
Shoot for the mask, not for the eye
The single highest-leverage decision in a catalog job happens before any software opens: locking the shoot down so every frame looks like every other frame. I mean physically locking it: camera on a tripod that does not move between SKUs, product position marked with tape on the sweep, lights at fixed power, exposure set manually so the backdrop lands at the same brightness in shot one and shot four hundred. Auto-exposure is the quiet enemy here, because it re-meters for every product and hands the segmentation model a subtly different scene each time.
The reason consistency matters so much is that the model’s behavior is consistent when its input is. Feed it four hundred photos with identical framing, backdrop tone, and lighting, and it will make the same kind of mask four hundred times, which means one QC decision covers the whole run. Feed it a mixed bag of window light, changed angles, and three different backdrops, and every image becomes its own negotiation. The mask quality per image might still be good; the predictability across images is gone, and predictability is what a batch workflow actually runs on.
A jig does not need to be expensive. Mine is a paper sweep, two softboxes that never move, a strip of gaffer tape marking the product zone, and a laminated card with the camera settings written on it so a reshoot six weeks later matches exactly. The card matters more than the softboxes. Catalogs are living things (new SKUs arrive, old photos get retired), and the batch you run in September should be indistinguishable from the one you ran in July.
Contrast decisions that pay off four hundred times
Segmentation models find edges where the subject and the background disagree: in tone, in color, in texture. Your job at the shoot is to manufacture that disagreement. For most catalogs a mid-gray sweep is the safest default: it separates from dark products and light products alike, it does not reflect a color cast onto the subject the way a saturated backdrop does, and it keeps contact shadows soft enough that the mask does not have to fight them. Pure white sweeps photograph beautifully but cost you separation on white and glass products exactly where you need it most.
Some SKUs are structurally hard no matter what you do: clear glassware, chrome fittings that mirror the room, white-on-white textiles, anything with fine mesh or fringe. I flag these before the batch run rather than discovering them inside it. The flagged group gets shot with extra care (a darker backdrop insert, a rim light to draw the silhouette) and gets budgeted double QC time. The capability reference at NSS Background Remover covers what the tool’s modes can recover from, but recovery is always more expensive than prevention, and at catalog scale that cost multiplies by the SKU count.
The pre-flagging habit sounds bureaucratic and takes about ten minutes: walk the product shelf with a notepad, mark anything transparent, reflective, furry, or backdrop-colored. On a typical hardgoods catalog that is five to ten percent of SKUs. Knowing the number in advance changes the schedule from a guess into a plan: ninety percent of the catalog will flow through the line untouched, and the flagged minority gets the attention it was always going to demand anyway.
What a browser batch really costs in memory
The Background Remover runs entirely on your machine (the write-up at How in-browser background removal works, end to end explains the full pipeline), and that design is why a catalog costs nothing per image and nothing in upload time. But it also means your machine is the render farm, and the budget that matters is RAM. A JPEG that is 3 MB on disk is not 3 MB in a batch. Decoded for processing, a 4000×3000 photo becomes width times height times four bytes of raw pixels: roughly 48 MB. The model needs an input tensor, an output mask, and working canvases on top of that, so a single full-resolution image can hold 150 to 250 MB of live memory at its peak.
The tab does not get all of your RAM either. Browsers cap what a single tab may hold, and other tabs, the OS, and whatever else is open all take their share first. This is why the failure mode of an oversized batch is not a slow run but a dead tab: the browser kills the process rather than let it eat the machine. The first time it happens with forty unsaved cutouts queued, you learn the lesson permanently: export as you go, never let finished work accumulate only in memory.
The practical upside of on-device processing shows up in the same arithmetic. The model loads once, at the start of the session, and every subsequent image skips that cost, so image two hundred processes exactly as fast as image twenty, with no rate limit, no per-image credit, and no queue behind other customers. The constraint is honest and local: your RAM, your CPU, your session. Plan around it and the throughput is genuinely competitive with paid cloud APIs; ignore it and the browser will plan for you.
Chunking: the run size your machine can hold
My chunk sizes come from crashing tabs so you do not have to. On a 16 GB machine processing typical 12-to-24-megapixel product photos, 20 to 30 images per run is the comfortable ceiling: the run completes, exports cleanly, and leaves headroom for the browser itself. On 8 GB, halve it: 10 to 15 images, and close everything else first. These numbers are deliberately conservative, because the cost of a crashed run is not the crash; it is re-verifying which images finished, which exported, and which silently did not.
Between chunks I export everything, verify the files landed on disk, then start the next chunk in the same session. If the machine has been running batches for an hour and feels sluggish, a fresh tab resets the tab’s memory watermark and costs one model reload, about the price of two images. The walkthrough at The image and video utility tools: resize, compress, upscale, stabilize covers the queue controls themselves; the discipline layer on top is mine, and it fits on an index card.
The rules below are that index card. They look almost insultingly simple, and each exists because I violated it once at scale and paid for the education.
- Chunk at 20–30 images on 16 GB of RAM, 10–15 on 8 GB, measured with typical 12–24 MP product photos.
- Export and verify on disk after every chunk; finished work living only in a tab is work you do not have yet.
- Keep the originals in a separate folder the batch never writes to: the source of truth survives any crash.
- Run the batch in a dedicated browser window with nothing else open; other tabs share the same memory pool.
- Process the flagged hard-case SKUs in their own small chunk at the end, when your QC attention is warmed up.
The QC pass: triage, not perfection
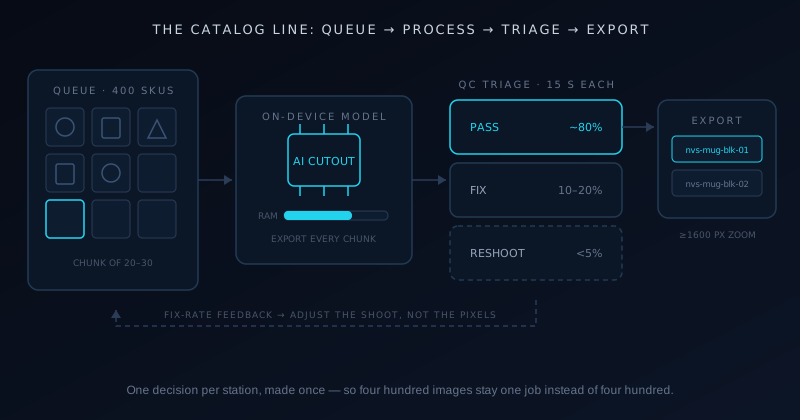
Quality control on four hundred cutouts fails in a specific way: you inspect the first dozen like a jeweler, fall behind, and wave the last three hundred through blind. The fix is to make QC a triage instead of an inspection. Every image gets the same fifteen-second look and lands in one of three buckets (pass, fix, or reshoot), and nothing gets repaired during the pass itself. Repairs are a separate work session with its own rhythm. Mixing judging and fixing is how a two-hour QC pass becomes a two-day one.
The fifteen-second look is structured: view the cutout against the checkerboard, then against pure white, then zoom to 100% on the two or three places this product type typically fails. Those are the underside where contact shadow lived, any handle or strap enclosing a hole of background, and whatever fine detail the product carries. Checkerboard reveals missing pixels; white reveals leftover dark halo; the zoom points catch the failures that thumbnails hide. Anything that survives all three is a pass, and most of a well-shot catalog will be.
The fix-rate is also your feedback loop to the shoot. When one product family keeps landing in the fix bucket for the same reason (say, every brushed-steel SKU losing its top edge into the backdrop), that is not a QC problem, it is a lighting problem, and ten minutes at the shooting table beats an hour of per-image repair. I keep a tally by failure type during triage precisely so the pattern is visible by the end of the pass instead of half-remembered a week later.
Fixing the fix bucket
The fix bucket, sorted honestly, is smaller than it feels (usually ten to twenty percent of a consistent shoot), and the repairs cluster into a handful of shapes. Leftover backdrop in an enclosed region, like the gap inside a mug handle, is the most common and the fastest: a manual erase inside a zoomed view, done in seconds. A soft halo along one edge where the backdrop was brightest responds to a light edge cleanup. A missing chunk of the product itself, where the model mistook low-contrast subject for background, means restoring from the original: the tutorial at Choosing the right mode and refining edges in NSS Background Remover shows the restore-brush workflow that makes this a paint operation rather than a redo.
Batch the repairs by type, not by SKU order. Doing all the handle-hole erases in a row, then all the halo cleanups, keeps your hand calibrated to one motion and one zoom level, and the per-image time drops noticeably by the fifth repeat. It is the same logic as the chunked processing run applied to human attention: context switching is the expensive part, so arrange the work to switch as rarely as possible.
Set a per-image time limit for repairs and hold it; mine is three minutes. Any cutout that needs more than three minutes of handwork was mis-bucketed and belongs in reshoot, because a reshoot with corrected lighting takes ninety seconds at a jig that is still standing. The limit feels arbitrary until the day you spend twenty minutes rescuing one difficult edge and realize the reshoot would have produced a better result in a tenth of the time.
Filenames and folder discipline
Naming is the least interesting station on the line and the one that determines whether the final upload takes an afternoon or a weekend. Marketplace bulk-upload flows, inventory spreadsheets, and your own future self all need the same thing: a filename that identifies the SKU and the view without opening the file. The scheme I settled on is lowercase throughout, hyphens as the only separator, the real SKU code first, then a view token, then a zero-padded sequence: nvs-mug-blk-front-01.png. No spaces, no underscores mixed with hyphens, no camelCase, because every system tolerates lowercase-with-hyphens and at least one system will mangle anything fancier.
The zero-padding earns its keep the first time anything sorts your files. Ten unpadded images sort as 1, 10, 2, and a spreadsheet paste built on that order silently mismatches every SKU from the second row down. Two digits covers any sane per-SKU image count. The view token (front, back, detail, scale) matters because marketplaces slot images by position, and a name that encodes the view lets you build the position mapping in the spreadsheet instead of by eyeballing thumbnails.
Folders follow the same principle: originals, cutouts, and marketplace-sized exports live in three separate directories, and nothing ever gets saved over an original. The originals folder is read-only in spirit: it is the asset you paid a shoot day for, and every downstream file is regenerable from it. When a marketplace changes its spec or a template redesign wants tighter crops, the catalog gets re-exported from originals in an hour precisely because nobody ever "just quickly fixed" a source file in place.
Do the renaming at export time, in one sitting, against the SKU spreadsheet, never during the shoot and never during QC. Renaming while shooting slows the camera work; renaming during triage pollutes a judgment task with a clerical one. A single dedicated naming session, spreadsheet on one monitor and files on the other, takes twenty minutes for a few hundred images and produces a folder where any file can be found by anyone in seconds. The spreadsheet then becomes the manifest for the upload, and the whole catalog is auditable: every SKU row either has its expected files or visibly does not.
Marketplace specs before you export, not after
Every marketplace publishes pixel requirements, and reading them before the export run means you export once instead of three times. Amazon wants the main image on pure white (RGB 255,255,255, not merely white-ish) with the product filling at least 85% of the frame, and at least 1600 px on the longest side to qualify for zoom; 500 px is the hard floor, but zoom measurably helps conversion, so 1600 is the real target. The full spec, including the category quirks, is broken down at Amazon product photo requirements (2026): the complete spec, explained, worth reading in full if Amazon is your main channel.
Etsy renders listing images at a 4:3 ratio and recommends 2000 px on the shortest side, which leaves croppable margin for its zoom viewer. eBay floors at 500 px on the longest side and recommends 1600 px, same zoom logic as Amazon. Shopify stores are your own rules, but 2048×2048 square has become the de facto standard because it survives every theme’s crop behavior. The pattern across all of them: export larger than the floor, land near the recommended zoom threshold, and keep the product’s frame-fill consistent so your listing grid looks like a catalog instead of a garage sale.
I keep the specs in the same spreadsheet as the SKU list, and the export session works down the sheet: white-composite at Amazon dimensions, transparent PNG masters archived, per-platform sizes generated from those masters. The platform-by-platform walkthrough at Prepping product photos for Amazon, Etsy, and Shopify covers the composite-and-resize mechanics inside the tool. By this station the line has done its job (the shoot was consistent, the batch survived, QC was honest, the names are clean), and the export is exactly what the last station of a production line should be: boring, fast, and final.
Frequently asked questions
Quick answers to common questions about this topic.
How many images can I batch process in a browser at once?
Size the run to your RAM, not your ambition. On a 16 GB machine with typical 12–24 megapixel product photos, 20 to 30 images per chunk runs comfortably; on 8 GB, keep it to 10 or 15 and close other tabs first. A decoded 4000×3000 photo occupies roughly 48 MB of raw pixel memory before the model’s own working buffers, so oversized batches kill the tab rather than merely slowing it. Export after every chunk so finished work lives on disk, then keep going: the model stays loaded, so later chunks process just as fast.
Do all my product photos need the same background for batch removal?
They do not need it, but the workflow massively rewards it. A segmentation model given identical framing, backdrop tone, and lighting produces the same kind of mask on every image, which means one QC judgment covers the entire run. Mixed backdrops and drifting exposure make every image an individual case, and the per-image review time is where catalog projects actually die. A mid-gray sweep, fixed lights, and manual exposure are the cheapest quality upgrade available: they cost nothing at the shoot and save hours downstream.
What is the best file naming convention for marketplace product images?
Lowercase, hyphen-separated, SKU first, view second, zero-padded sequence last, for example nvs-mug-blk-front-01.png. Every upload system tolerates that format, filenames sort correctly in spreadsheets and file browsers, and the view token lets you map images to marketplace slot positions without opening a single file. Avoid spaces, mixed separators, and unpadded numbers; unpadded sequences sort as 1, 10, 2 and will silently scramble any spreadsheet-driven bulk upload built on file order.
What image size does Amazon require for product photos?
The main listing image must sit on pure white (RGB 255,255,255) with the product occupying at least 85% of the frame. The technical floor is 500 pixels on the longest side, but 1600 pixels is the number that matters, because that is Amazon’s threshold for zoom-on-hover, and zoom demonstrably helps buyers and conversion. I export at 2000 px or more on the longest side so the same master file clears Amazon’s zoom bar, eBay’s 1600 px recommendation, and Etsy’s 2000 px shortest-side guidance without a second pass.
Is browser-based batch background removal slower than a cloud API?
Per image, a modern machine is in the same range as cloud round-trips once you count upload time, and the browser approach has no rate limit, no queue, and no per-image fee, which changes the economics of a four-hundred-image catalog completely. The model loads once per session, so throughput is steady from image ten to image three hundred. The honest constraint is your own hardware: RAM sets the chunk size and CPU sets the pace. For catalog work where photos are also commercially sensitive, keeping every file on your own machine is a second advantage that has nothing to do with speed.
Related workflow
Product photo to a transparent image every channel accepts
One photograph, cut out once, then re-encoded for a storefront, a marketplace listing and a social post without redoing the cutout each time.
- Cut the background out and check the edgesNSS Background Remover: Hair, glass and drop shadows are where automatic cutouts fail. Fix them once, on the master, before anything downstream copies the mistake.
- Re-encode and resize per destinationNovus Convert: Transparency survives PNG and WebP and dies in JPEG. Convert validates the file it hands back, so a listing never rejects a silently broken upload.
Related troubleshooting
Was this page helpful?
Your answer stays in this browser, it is not sent anywhere and no account or cookie is involved.