2026 · Novus PDF StudioAbout 13 min readNovus Stream Solutions
From paper to signed PDF with just a phone and a browser
No scanner, no desktop software: just a phone camera and a browser tab. This is my full route from a paper form on the kitchen table to a signed, flattened PDF ready to send: shooting the page properly, importing the scan, laying fields over the image, signing, exporting, and the failure cases I plan around.
Contents
- 1.The errand this replaces
- 2.Photographing the page so the pixels cooperate
- 3.Turn the photos into a PDF before leaving the phone
- 4.Importing the scan into the browser editor
- 5.Laying fields over a photograph of paper
- 6.A signature that reads as deliberate
- 7.Exporting one flattened, share-ready file
- 8.The failure cases I plan around
The errand this replaces
The old version of this chore had a shape everyone recognizes: a paper form arrives, and somewhere between you and “done” stands a printer that may or may not have ink, a flatbed scanner at a library or an office, and a pen-sign-rescan loop that eats an afternoon. I refuse to run that loop anymore. A modern phone camera captures paper at a quality flatbed scanners envied a decade ago, and a browser-based editor handles the filling and signing that used to require desktop software. The whole chain (paper on the table to signed PDF in an email) now happens with two devices I already own.
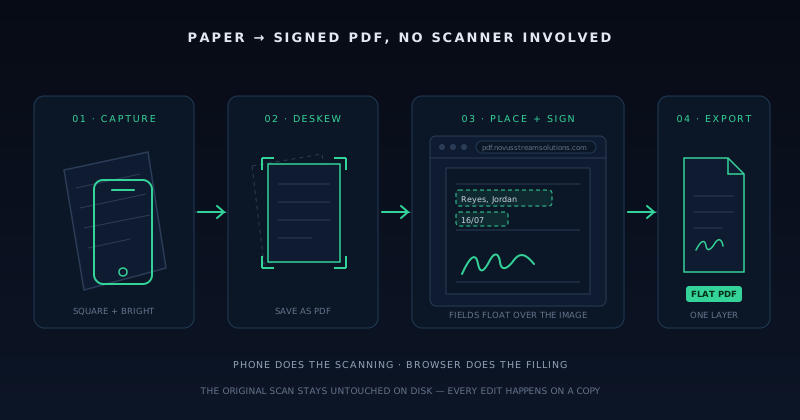
The workflow has five stages, and every one of them is quick once you know its single trick. Photograph the page well, which is mostly about light and angle. Let the phone turn the photo into a straightened PDF, which built-in scanning modes do automatically. Import that PDF into Novus PDF Studio in any browser. Place fields over the scanned image and draw a signature. Export one flattened file that is ready to send. None of these stages needs an account, a subscription, or an app install beyond what shipped with the phone.
One honest boundary before we start: a photographed form is a picture of paper, not a structured digital document, and the workflow below is built around that fact. The parts of PDF Studio that reason about digital form structure will have little to work with here, so the field placement will be manual, and I will show you why that turns out to be less of a burden than it sounds. What matters is that the output at the end (a legible, signed, flattened PDF) is indistinguishable in usefulness from one that started life digital.
Photographing the page so the pixels cooperate
Everything downstream inherits the quality of the capture, so I spend my thirty seconds of care here rather than in cleanup later. Light comes first: daylight from a window beats every indoor bulb, and indirect daylight beats direct sun, which blows out white paper into glare. I lay the form on a dark, matte surface (a wooden table works, a black folder is better) because contrast between page and background is what lets scanning software find the paper’s edges. Overhead room light plus my own shadow across the page is the classic failure; I stand so my body blocks nothing.
Angle is the second discipline. The camera should look straight down at the page, lens parallel to the paper, not tilted toward it from a seated position. A tilted shot produces keystone distortion (the page renders as a trapezoid, the top line of text larger than the bottom), and while deskew software corrects mild trapezoids well, it corrects severe ones by stretching pixels, which smears exactly the small print you need legible. I hold the phone flat with both hands directly over the center of the page and lower it until the paper fills most of the frame with a thin margin all around.
Fill the frame, but do not crop in-camera. Leaving a small border of the dark background around all four edges gives the edge-detection something to lock onto, and the scanner mode will crop to the paper boundary more accurately than my thumbs will. Resolution is rarely the problem on modern phones (a standard capture carries far more detail than a fax-era form needs), but focus can be, so I tap the screen on the densest block of text before shooting and glance at the preview to confirm the smallest print reads crisply.
Multi-page forms get one photo per page, shot in page order, in the same spot with the same light so the pages match visually. It is tempting to batch this carelessly and fix it later; resist that. Ten disciplined seconds per page produces a document that looks like it came off an office scanner, and no amount of downstream editing turns a shadowed, skewed, out-of-focus capture into a professional one.
Turn the photos into a PDF before leaving the phone
Both phone platforms ship a genuine document scanner, and using it (rather than the bare camera roll) is the step people skip and then regret. On iPhone, the Notes app’s scan-documents mode finds the page edges, deskews the perspective, boosts the contrast so the paper reads white and the ink reads black, and saves the result directly as a PDF. On Android, the Google Drive scan function does the same dance. Multi-page forms become one multi-page PDF automatically, in the order you shot them, which saves an assembly step no browser tool needs to do for you.
This on-phone conversion sidesteps a format problem before it exists. A bare iPhone camera photo is typically HEIC, a format the wider document world still handles unevenly; the scanner modes skip that entirely by emitting a PDF. When I do end up with loose camera photos anyway (someone else shot the form and texted it to me), I run them through the converter I wrote about in Novus Convert launch: private file conversion with verified outputs to get standard JPGs, then use the phone’s print-to-PDF or share-as-PDF path to produce the document. More steps, same destination; the scanner mode is simply the shortcut.
Before moving on, I open the fresh PDF on the phone and zoom into the worst corner (usually the bottom of the page, farthest from the light) and ask one question: could a stranger read every field label? If yes, the capture phase is over. If no, reshooting now costs one minute, while discovering the problem after placing twenty fields in the editor costs the whole session. The PDF then gets to my computer however is convenient: email to myself, cloud folder, or a cable. The browser editor does not care how the file arrives.
Importing the scan into the browser editor
With the scanned PDF on whatever machine has the biggest screen available, I open the editor at pdf.novusstreamsolutions.com and upload it like any other document. The page renders in the workspace exactly as the phone captured it: the slight paper texture, the printed form lines, all of it now a fixed image serving as the canvas I will build fields on top of. If you have never used the editor at all, the beginner walkthrough at How to fill and sign a PDF form with Novus PDF Studio covers the workspace itself; here I will stay focused on what is different when the underlying page is a scan.
The difference is structural. A digitally born PDF contains text and lines the software can reason about; my scan contains pixels that merely look like text and lines. That means the AI field scan, which shines on structured digital forms, has little to grab onto here, and I plan for hand placement from the start rather than running the scan and being disappointed by it. Framing this as a limitation misses the point: the editor’s layer model was built for exactly this, floating live fields over any fixed page, and a photograph of paper is just another fixed page.
Two habits carry over from every other PDF session, and they matter more here because the capture cost real-world effort. The scan stays untouched on disk as my working original, so no editing mistake ever sends me back to the kitchen table with the camera. And I resolve every question about the form’s content (which boxes apply to me, what the office expects in the ambiguous blank) before I start placing fields, because a scan of a form carries none of the interactive hints that sometimes clarify a digital one.
Laying fields over a photograph of paper
Placing fields on a scan is the same mechanical act as placing them on a digital form (drag a text, number, check, date, or signature layer where it belongs) with one perceptual twist: the lines I am aligning to are photographed ink, and even a well-deskewed page has rules that drift a pixel or two across their length. So I align each field to its local line segment, not to an imaginary global grid. A text layer that sits perfectly on the left end of a long blank may float slightly above the right end; nobody reading the form will ever notice, but a field snapped to a rigid grid fights the page constantly and loses.
I work in one deliberate sweep: top of page one to the bottom of the last page, placing every field the form needs before typing a single value. Placement and filling are different mental modes (one is spatial, one is verbal), and alternating between them per field is where boxes get skipped. During the placement sweep I also decide types with the same rules I always use: prose gets text layers, amounts get number layers, tick boxes get a check or cross matching the form’s instruction, dates get date-style fields in the format the paper hints at. The full manual technique lives in Placing and styling PDF fields by hand: text, numbers, checks, dates if the placement toolset is new to you.
Duplication is even more valuable on scans than on digital forms. Once one field sits correctly against a photographed line, copying it preserves dimensions that I know work against this particular capture, and I just walk the copies down the page into their rows. For character-per-cell boxes (common on government paper), Courier at a size matched to the cell spacing drops one character per cell with almost no fiddling, which feels faintly miraculous the first time it lands.
Font size deserves one scan-specific note: match the scale of the photographed form, not your screen. A capture shot slightly wide renders the whole page smaller, and a ten-point font that would suit the paper original can tower cartoonishly over the photographed blanks. I size my first text field so its height roughly matches the printed label text beside it, confirm it looks proportionate at one hundred percent zoom, and let every duplicated field inherit that calibration.
A signature that reads as deliberate
The signature is the reason this document exists, so it gets more patience than any other layer. I draw it with the signature tool and fully expect to discard the first two or three attempts: a trackpad or mouse signature takes a few tries before it stops looking like a seismograph reading, and redrawing costs nothing. On a laptop with a touchscreen, or by doing the drawing step on the phone’s browser where a fingertip works naturally, the curve quality jumps immediately. What I am after is not calligraphy; it is a mark that looks like a person signed on purpose.
Placement against a photographed signature line follows the same local-alignment rule as every other field, with tighter tolerances because this is the layer a human will actually scrutinize. The signature should sit on the printed line, sized like a pen signature would be (roughly the height of two lines of the form’s text) without colliding with the printed name, the date blank beside it, or the “sign here” label under it. The dedicated walkthrough at Drawing a signature and exporting a finished PDF covers the fine points, including multi-signature documents where initials recur on every page.
Worth restating plainly: this is a visual fill-and-sign signature, the kind that completes the enormous majority of everyday paperwork (school forms, leases, intake sheets, authorizations). It is not a certificate-based cryptographic signature, and PDF Studio does not pretend otherwise. On the rare occasion a counterparty requires verified digital signing infrastructure, that is a different product category, and knowing the boundary in advance beats discovering it after submission.
The failure cases I plan around
Most botched runs of this workflow trace back to the first ninety seconds, which is why the capture section above is the longest. Blur from a moving hand, a shadow band across the middle third of the page, keystone from shooting at a lazy angle, and a clipped margin that amputates the form’s edge are the four classic captures that no downstream step can rescue. Each one costs a reshoot, and each reshoot costs a minute; the entire discipline is noticing them on the phone screen rather than in the editor.
A different class of failure comes from the source material itself. A form photographed off a computer monitor arrives with moiré interference patterns that make small text swim; if the form exists on a screen, it exists as a file, and the file should travel directly to the editor without a camera in the loop. Glossy paper under a ceiling light produces a white glare patch that erases whatever was printed beneath it; reangle the page or kill the overhead light. And a crumpled form photographs as a landscape of small shadows; two minutes under a heavy book beforehand pays for itself.
The last trap is procedural rather than photographic: submitting the working session instead of the flattened export, or exporting before the final placement sweep and mailing a form with one empty field. My guard is a fixed order of operations that never varies: place everything, fill everything, sign, review inside the editor, export, review the export cold, then send. The sequence sounds bureaucratic for a kitchen-table errand, and it is precisely why the errand only ever takes one attempt.
- Blurry capture: tap to focus on dense text and hold still; check the preview at full zoom before leaving the table.
- Shadow band: light from a window beside you, never an overhead bulb behind you.
- Keystone trapezoid: shoot straight down, lens parallel to the paper, page centered.
- Clipped edges: keep a thin dark border visible around all four sides and let the scanner mode do the cropping.
- Moiré from screens: never photograph a monitor; obtain the actual file instead.
- Glare on glossy stock: reangle the page relative to the light source until the hotspot slides off the text.
Frequently asked questions
Quick answers to common questions about this topic.
Do I need a scanner app or can I just use the camera?
Use the scanning mode your phone already ships with rather than the bare camera: Notes on iPhone or the Google Drive scan function on Android. Both find the page edges, correct the perspective, boost contrast so paper reads white and ink reads black, and save a multi-page PDF directly. A raw camera photo skips all of that and often arrives as HEIC, which adds a conversion step. The scanner modes cost nothing, are already installed, and produce a file the browser editor accepts immediately.
Will the AI field scan detect fields on my photographed form?
Plan on placing fields by hand. The scan reasons about digitally structured forms (real text, real lines), and a photographed page is pixels that merely resemble that structure, so it has little to work with. Manual placement over a scan is faster than it sounds: place one field correctly against a photographed line, then duplicate it down the page so every copy inherits dimensions you know fit this capture. A full placement sweep on a typical one-page form takes a few minutes.
What makes a phone capture good enough for a form?
Three things: indirect daylight on a dark matte background, the lens held parallel to the paper directly above its center, and the page filling most of the frame with a thin border for edge detection. Tap to focus on the densest text before shooting, and zoom the preview to confirm the smallest labels read crisply. Avoid the classic failures: your own shadow across the page, a tilted angle producing a trapezoid, glare off glossy stock, and photographing a screen, which creates moiré patterns.
Is the drawn signature legally meaningful?
It is a visual fill-and-sign signature (the digitized equivalent of signing with a pen), which is what the vast majority of everyday paperwork asks for: school and medical forms, leases, authorizations, intake sheets. It is not a certificate-based cryptographic signature, and Novus PDF Studio does not claim to provide one. If a specific counterparty requires verified digital-signing infrastructure with identity certificates, that is a separate product category, so confirm the requirement before assuming a drawn signature suffices.
Why export a flattened file instead of an editable one?
Because a completed form should behave like completed paper. Flattening commits your typed values, marks, and signature into the page, so the recipient sees exactly what you reviewed, no viewer can accidentally alter a value, and the file prints predictably through any intake system. The working discipline is to keep your original scan untouched, fix any post-export mistake in the editor, and export a fresh copy; the flattened file is the deliverable, and the editor session is where changes happen.
Related workflow
Any document to a signed, sendable PDF
A form that arrived as a scan, a DOCX or an image becomes a filled, signed PDF small enough to email, without a single upload to someone else’s server.
- Bring the source into PDFNovus Convert: Images, documents and ebooks all land as PDF here, so the editor downstream only ever sees one format.
- Fill the fields and signNovus PDF Studio: The AI field scan proposes the boxes; every one stays editable, because a form editor that cannot be corrected is worse than no editor.
- Compress before sendingNovus Convert: Adjustable quality with the measured output size shown before download, so there is no guessing whether it cleared the limit.
Related troubleshooting
Was this page helpful?
Your answer stays in this browser, it is not sent anywhere and no account or cookie is involved.