Novus PDF Studio
Drawing a signature and exporting a finished PDF
A focused walkthrough of the last stretch in Novus PDF Studio: get the page ready, add a signature field, draw your mark, place it cleanly, and export a finished PDF you trust.
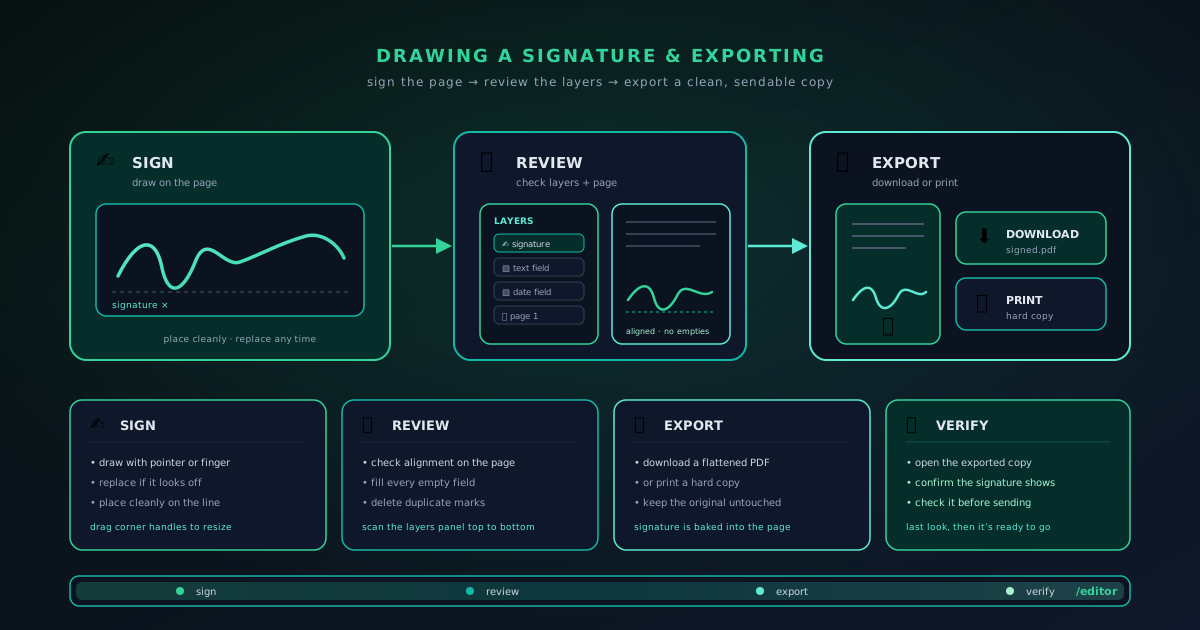
Signing a form is usually the very last thing you do to a PDF, and it is the step people get wrong most often: a signature dropped in the wrong place, a name that overlaps the printed line, or an exported file that looks fine on screen but prints crooked. Novus PDF Studio, the free browser editor at pdf.novusstreamsolutions.com, keeps this final stretch deliberately simple: you draw a signature directly onto the page, place it exactly where it belongs, and export a finished document you can download or print. This tutorial walks through that closing sequence in detail, so the signed copy you hand over looks precisely the way you intended and not like an afterthought pasted on at the end.
Everything here happens inside the live editor, so we only cover what the tool actually does today. PDF Studio is a fill-and-sign workspace: it can scan a form for likely fields, let you add and style fields by hand, capture a drawn signature, and produce a downloadable PDF. It does not compress or convert files, and it does not run OCR on scanned paper, scrub metadata, or redact sensitive text. Knowing that boundary up front is genuinely useful, because it means you can lean on PDF Studio for the job it is built for, a clean signature and a clean export, and reach for a different tool when you need one of those other operations.
Contents
Two ways to finish
Draw and go
Add a signature field, draw your mark, drop it on the line, and download. Best for a simple form you just need signed and sent.
Place with precision
Align every field first, size the signature to the printed line, style the date beside it, then export and verify. Best for tight or official forms.
- 1
1. Get the page ready before you sign
A signature only looks right when the page underneath it is already settled, so resist the urge to sign first. Open your document at pdf.novusstreamsolutions.com/editor and upload it, then get the rest of the form into its final state before you touch the signature tool. If the form has obvious blanks and boxes, run the AI field scan to place likely fields as editable layers; if it is a simpler page, add the fields you need by hand. Either way, fill in the names, dates, and amounts first. The beginner walkthrough at How to fill and sign a PDF form with Novus PDF Studio covers that full setup end to end if you are starting from scratch.
The reason for this order is entirely practical. When you drop a signature onto a page that still has fields shifting around, you end up nudging the signature again every single time you move a nearby box. By locking down the layout first, you give yourself a stable target to aim at. Zoom in on the area around the signature line so you can see exactly where the printed rule sits and how much vertical room you actually have to work with. A signature that clears the line by a hair on screen can still touch it once the PDF is rasterised for print, so give yourself a little margin rather than trusting a pixel-tight fit.
Work on a copy while you are learning the flow. Keep your original file untouched as the source of truth, and treat the export as a fresh finished version rather than an edit of the master. If the AI scan added fields you do not want near the signature area, remember you can clear the AI-generated fields on their own, without wiping the manual work you have already done. For a deeper look at aligning and styling those underlying fields so the signature has a tidy frame to sit in, see Placing and styling PDF fields by hand: text, numbers, checks, dates before you commit to the final placement.
- Upload at /editor and finish the text, date, and number fields first.
- Zoom in on the signature line so you can judge spacing accurately.
- Keep the original file; export a finished copy instead of overwriting it.
The closing loop: ready the page, add a signature field, draw, place, and export. - 2
2. Add a signature field where the ink will go
In PDF Studio a signature is its own field type, in the same family as the text, number, date, and check or cross fields. Adding one gives you a defined region on the page that holds your drawn mark, and that is exactly what lets you move, resize, and reposition the signature later without redrawing it from scratch. Place a signature field over the line or box the form provides. If the AI scan already flagged a signature target, check whether it landed in the right spot and adjust it; if it missed the area entirely, add a signature field manually and drag it into position over the printed line.
Size the field to match the space you actually have. A signature box that is too tall will push your drawn mark up into the line above; one that is too short will cramp the stroke and make it look pinched and hesitant. Aim to match the height of the printed signature line and leave a little breathing room on the left and right. Because the field is a movable layer, you are not committing to anything permanent at this point: you are simply reserving the space, and you can fine-tune the dimensions after you see your actual signature sitting inside it.
If the form asks for more than one signature (an applicant and a witness, say, or a signature repeated across several pages), add a separate field for each one. You can duplicate an existing signature field to keep the sizing consistent, then drag each copy to its own line. Keeping every signature in its own field, rather than trying to reuse a single mark across the whole document, means each one exports at the right position and none of them drift when you adjust another. The Novus PDF Studio reference lists every field type if you want the full inventory before you start.
- Add a signature field the same way you add text or date fields.
- Match the field height to the printed line and leave side margins.
- Duplicate the field for witness lines or multi-page signatures.
- 3
3. Draw your signature
With the field in place, open the signature tool and draw. On a trackpad or mouse, sign in one continuous motion wherever you can, because short, connected strokes read as a signature far more convincingly than a series of careful, disconnected letters. On a touchscreen or tablet you can use a finger or a stylus, which usually produces a smoother line than a mouse ever will. Do not worry about matching your pen-on-paper signature stroke for stroke; a legible, consistent mark that clearly reads as yours is what a filled form actually needs, and chasing an exact replica tends to make the result look worse, not better.
If the first attempt comes out shaky or lands at an awkward size, replace it and draw again rather than trying to fix a bad stroke. The tool lets you redraw the signature as many times as you need, so treat the first few passes as practice runs. Slowing down slightly and using a larger drawing motion often gives a cleaner result, because small, tight movements exaggerate every wobble in your hand. Once you have a version you are genuinely happy with, that captured mark becomes the content of the signature field and moves with the field wherever you place it next.
It is worth being clear about what this is. A drawn signature in PDF Studio is a visual mark placed on the page, not a cryptographic digital signature or a certificate-based e-signature. It is the right tool for the everyday case (signing a form, an agreement, or an internal document that asks for a handwritten mark) but if you are dealing with a workflow that legally requires a verified digital certificate, that is a different category of product entirely and not something the current editor claims to provide. For the vast majority of fill-and-sign tasks, a clean drawn signature is exactly what the recipient expects to see.
- Draw in one continuous motion; a stylus or finger beats a mouse for smoothness.
- Redraw freely: replace a shaky mark instead of patching it.
- This is a visual signature, not a certificate-based digital signature.
- 4
4. Place and style the signature cleanly
Now position the signed mark precisely. Drag the field so the baseline of your signature sits just above the printed line, not on top of it and not floating well above it. If the signature runs long, resize the field to bring the whole mark down to a width that fits between any surrounding text; if it looks lost inside a large box, tighten the field until the signature fills it naturally. The goal is a signature that looks placed rather than pasted: aligned to the form the way a pen would have left it, with the ink sitting on the line the form drew for it.
Check the neighbours carefully. Signature areas on real forms are crowded: there is usually a printed name, a title, or a date field sitting right beside the line. Make sure your mark does not overlap any of that printed text or collide with your own date and name fields. If a date field belongs next to the signature, this is the moment to place it, using a PDF-safe font such as Helvetica, Times Roman, or Courier so the exported text renders predictably across every reader. Consistent fonts, sizes, and colours across your fields keep the finished page looking deliberate instead of assembled piece by piece.
Give the whole signature block one honest look at full zoom before you move on. Does the signature clear the line? Is the date beside it legible and correctly formatted? Are the name and title sitting where the form expects them? Small adjustments here cost you seconds and save you from re-exporting later. If you find the underlying fields still need alignment work, the layout tutorial at Placing and styling PDF fields by hand: text, numbers, checks, dates goes deeper on moving, resizing, and styling fields so the signature has a clean, well-ordered frame to sit inside.
- Sit the signature baseline just above the printed line, not on it.
- Keep the mark clear of surrounding printed text and your own fields.
- Add the date field alongside using a PDF-safe font for a clean render.
- 5
5. Do a final review before you export
Before you export anything, do a deliberate pass over the whole document, not just the signature. Walk through each page visually and check the layers: look for fields that sit slightly too high, boxes that are duplicated by accident, values you meant to fill but left blank, and any leftover AI-suggested fields you never cleaned up. The AI scan is a real time-saver for placing likely fields, but it is a first draft, and this human review is the step that turns a rough auto-filled form into a document you are genuinely willing to put your name on and send.
This is also the point to be clear-eyed about what the export will and will not do. PDF Studio produces a finished, flattened-looking PDF of your filled form and signature. It does not redact anything (if there is sensitive text already on the page, drawing a field over it does not remove the underlying content) and it does not strip metadata. If your document genuinely needs redaction or metadata cleanup, handle that in a dedicated tool, because those are not features of the current editor, and pretending otherwise would quietly put your data at risk.
If you want to understand exactly how the editor handles your file while you work, the /how-it-works page and the Privacy policy page spell out the model, and they are worth a read the first time you sign something you actually care about. A minute spent confirming what happens to your document is never wasted, especially for anything carrying personal or financial details. Once the review passes and you are comfortable with where the boundaries sit, you are ready to produce the finished file with a clear conscience.
- Check every page and every layer, not just the signature.
- Confirm no fields are blank, duplicated, or slightly misaligned.
- Remember: no redaction or metadata cleanup here.
- 6
6. Export the finished PDF
When the page looks right, export it. PDF Studio gives you two finishes: download the completed PDF as a file, or send it straight to print. Downloading is the usual choice when you need to email, upload, or archive the signed form; printing is there for the cases where a physical copy is the actual deliverable, or where a workflow still expects paper. Either way, what you see in the editor is what comes out: the signature, the field values, and the placement all carry through to the exported document exactly as they appeared on screen.
Choose the download option for anything you plan to send digitally, and give the file a clear name so you can find it again later, something that identifies the form and the date rather than a generic default string. If you are signing several copies of the same form for different people, export each one before starting the next, so you do not lose track of which version carries which set of values. The export itself is quick; the small discipline of naming and saving deliberately is what keeps a batch of signed forms from turning into a guessing game a week later.
There is no paywall on this step, and that is the whole point. Exporting the finished PDF is part of the core tool, not a locked feature you have to pay to unlock. The Novus approach is that the thing you actually came to do, signing and downloading your document, stays free. Ads support the app, but they never sit between you and your exported file, and there is no per-document limit waiting to stop you. You can sign and export as many forms as you need without ever hitting a checkout screen.
- Download to send or archive; print when a physical copy is the deliverable.
- Name the file clearly by form and date before you save it.
- Exporting is free: no paywall stands between you and the finished PDF.
- 7
7. Open the exported copy and confirm it
Do not treat the export as the finish line: open the downloaded file and look at it before you send it anywhere. Close the loop by viewing the exported PDF in your own PDF reader, not just inside the editor, because your recipient will see it in a plain reader too. Confirm the signature is present and sitting where you placed it, that every field value came through, and that nothing shifted or clipped during export. This thirty-second check is the single most reliable way to catch a problem while it is still trivially easy to fix, before the document has left your hands.
If something is off (a signature that drifted, a field that rendered in the wrong font, a value that did not appear), go back to the editor, adjust, and export again. Because you kept your original file and treated the export as a fresh copy, re-exporting costs you nothing but a moment of your time. Iterating this way, export then verify then adjust, is far safer than sending a signed document you have only ever seen inside the tool that made it. The recipient sees the exported PDF and nothing else, so the exported PDF is the version that genuinely has to be right.
Once the downloaded copy checks out, you are done: attach it, upload it, or print it with confidence. If you want to go further with the editor (placing fields more precisely, styling them, or setting up a form you reuse often), the Novus PDF Studio documentation and the tutorials at How to fill and sign a PDF form with Novus PDF Studio and Placing and styling PDF fields by hand: text, numbers, checks, dates cover the rest of the workflow in depth. For the common job of signing a form and handing over a clean PDF, though, this sign-and-export loop really is the whole story.
- Open the downloaded PDF in a normal reader before sending it.
- Confirm the signature, fonts, and every field survived the export.
- Re-export from your untouched original if anything looks wrong.
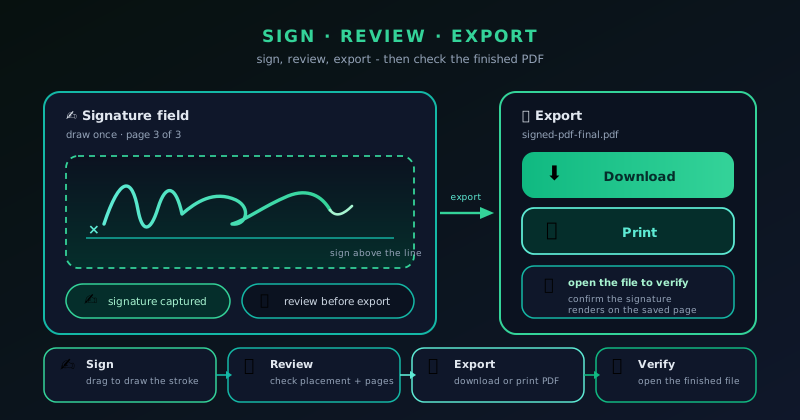
Sign last, verify after export
The two habits that make signed PDFs trustworthy are simple: finish and align every field before you draw the signature, and open the exported file in a separate reader before you send it. Keep your original untouched, sign on a copy, and let the downloaded PDF, the version your recipient actually sees, be the one you sign off on.
Frequently asked questions
Quick answers to common questions about this topic.
How do I add a signature to a PDF for free?
Open Novus PDF Studio at pdf.novusstreamsolutions.com/editor, upload your PDF, add a signature field where the line is, draw your signature with a mouse, finger, or stylus, position it above the line, and download the finished file. Signing and exporting are free with no paywall.
Can I redraw my signature if it looks wrong?
Yes. The signature tool lets you replace and redraw your mark as many times as you like. If a stroke comes out shaky, draw a fresh one rather than trying to patch it; the new signature simply takes the place of the old one in the field, at whatever size and position you set.
Is a drawn signature in PDF Studio a legal digital signature?
It is a visual, handwritten-style mark placed on the page, which suits most everyday fill-and-sign needs. It is not a certificate-based or cryptographic digital signature, so if a workflow legally requires a verified digital certificate, use a dedicated e-signature service for that particular step.
How do I export the finished PDF?
When your review passes, choose download to save the completed PDF as a file, or print to send it straight to a printer. What you see in the editor (signature, field values, and placement) carries through to the export, so open the downloaded copy once in a normal reader to confirm before sending.
Related workflow
Any document to a signed, sendable PDF
A form that arrived as a scan, a DOCX or an image becomes a filled, signed PDF small enough to email, without a single upload to someone else’s server.
- Bring the source into PDFNovus Convert: Images, documents and ebooks all land as PDF here, so the editor downstream only ever sees one format.
- Fill the fields and signNovus PDF Studio: The AI field scan proposes the boxes; every one stays editable, because a form editor that cannot be corrected is worse than no editor.
- Compress before sendingNovus Convert: Adjustable quality with the measured output size shown before download, so there is no guessing whether it cleared the limit.
Related troubleshooting
Was this page helpful?
Your answer stays in this browser, it is not sent anywhere and no account or cookie is involved.