Novus PDF Studio
Using the AI field scan to fill a PDF form fast
Run the AI field scan in Novus PDF Studio to turn a blank PDF form into editable layers in seconds, then review, fill, sign, and export a clean finished document.
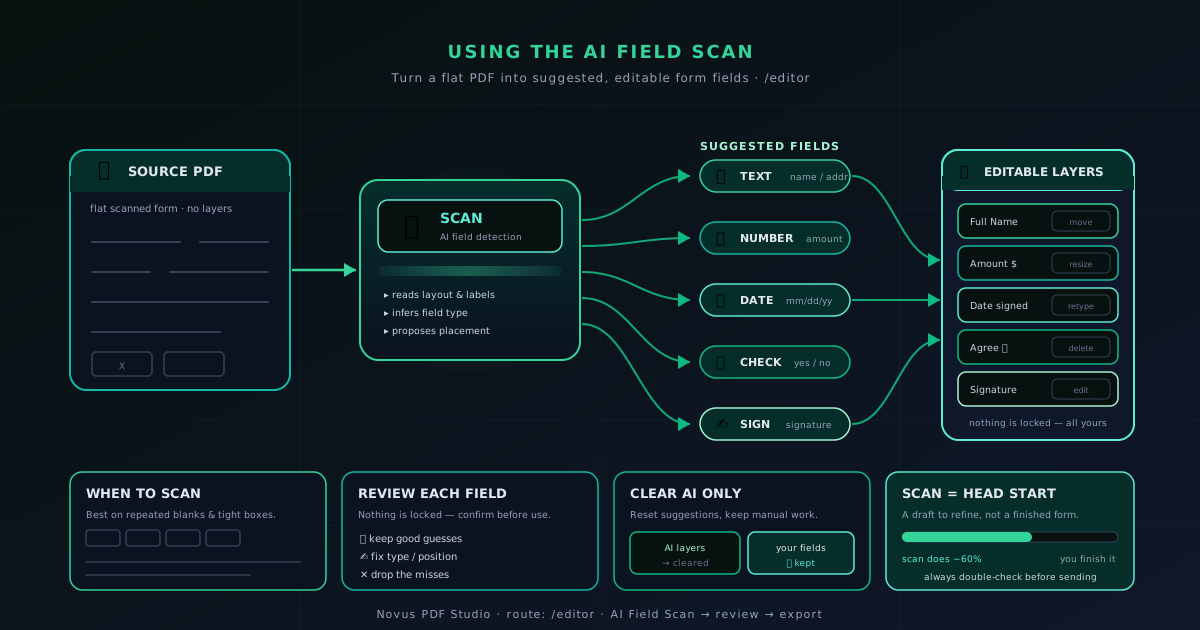
The slowest part of finishing a PDF form is not typing the answers. It is building the boxes to type into: dragging a text field over every blank, guessing the right width for a date line, and doing it forty times before you reach the signature. The AI field scan in Novus PDF Studio removes most of that setup. You upload a form, run one scan, and the editor places its best guess at every fillable spot as a real, editable layer you can adjust. This tutorial walks through that scan-first workflow end to end, from upload at pdf.novusstreamsolutions.com to a finished PDF you can download or print.
It helps to be honest about what the scan is and is not. It is a fast way to propose fields on a form that already has structure: labels, lines, boxes, and blanks the software can reason about. It is not OCR for a photo of a paper document, and PDF Studio does not read scanned raster pages, run redaction, compress, or convert files. Those simply are not live tools yet. What the scan gives you is a strong first draft of the form layout, and your job is to review it before you trust it. If you want the complete beginner arc, How to fill and sign a PDF form with Novus PDF Studio covers the whole fill-and-sign flow, and Novus PDF Studio documents the editor surface this tutorial lives inside.
Contents
Two ways to finish
Scan and go
Let the scan place every likely field, do a quick visual review, then fill and export. Best for clean, well-structured forms.
Scan then correct
Use the scan as a starting grid, then fix misses by hand with the manual field tools. Best for tight or unusual layouts.
- 1
1. Open the editor and upload the form
Start at pdf.novusstreamsolutions.com/editor. The workspace opens directly in your browser, so the PDF stays visible on the page while you work; there is no separate import screen and nothing to install. Drop in the form you need to complete, whether that is an application, an intake sheet, a permission slip, or an invoice template with blanks to fill.
The scan works best on a form that is already digital and text-based. A PDF exported from a word processor, a government form downloaded as a PDF, or a template a colleague sent you are all ideal, because the underlying labels and lines give the scan something to reason about. A photo of a paper page flattened into a PDF gives it far less to work with, since PDF Studio does not perform OCR on scanned images today. If your only copy is a phone photo, expect to place most fields by hand.
One habit worth keeping from the start: treat the file you upload as a working copy and leave your original untouched on disk. You will export a fresh finished PDF at the end, so there is never a reason to overwrite the source while you are still learning where the scan lands.
- Open /editor and upload a text-based PDF form.
- Digital, structured forms scan far better than photographed paper.
- Keep the original file; export a finished copy at the end.
The scan proposes editable field layers; you review, fill, sign, and export. - 2
2. Run the AI field scan
With the form loaded, trigger the AI field scan. In a moment the editor reads the page and drops in a set of suggested fields: text lines over the blanks, boxes over the tick spaces, a date-style field over anything that looks like a date, and a signature target where it expects a signature. Each of these arrives as an editable layer, not baked-in ink, which is the whole point of the feature. Nothing is committed until you export.
This is the moment that saves the most time. On a well-built form, a single scan can place the majority of the fields you would otherwise have dragged out one by one. Think of it as the software doing the tedious first pass so your attention goes to accuracy instead of layout labor. The scan is a proposal, though, not a verdict, so resist the urge to start typing immediately.
If the scan clearly misread the page (too many stray boxes, fields in odd places, a form it did not understand), you do not have to keep any of it. PDF Studio lets you clear the AI-generated fields on their own, separately from clearing the whole workspace, so you can wipe a bad scan and either rerun it or switch to placing fields by hand. That separation matters: clearing the scan never throws away the document or any manual fields you have already made.
- One scan proposes text, checkbox, date-style, and signature fields as layers.
- Every suggestion is editable, not permanent, until you export.
- Clear only the AI fields if the scan misfires; the document stays put.
- 3
3. Read what the scan actually found
Before you fill anything, walk the page and read the results with a critical eye. The fastest failure mode with any auto-detection tool is trusting it blindly, so give the scan the same scrutiny you would give a coworker who set up the form for you. Look for three things: fields the scan placed correctly, fields it placed in roughly the right spot but at the wrong size or position, and blanks it missed entirely.
Correct fields you can leave alone. Near-misses are the common case and the easy fix: a text line that sits a few pixels too high, a checkbox that landed slightly left of its box, a date field stretched wider than the printed line beneath it. Those get nudged into place in the next step rather than deleted. Missed blanks, where the form has a space to fill but no field appeared, are where you will add a manual field yourself.
Also watch for the opposite problem: fields the scan invented over things that are not really inputs, like a box around a heading or a stray line under a paragraph. Delete those so they cannot collect a value by accident. Reading the whole page once, top to bottom, before touching any values keeps you from filling a field you were about to remove.
- Sort the results into correct, near-miss, and missing.
- Delete phantom fields the scan placed over non-inputs.
- Note every blank the scan skipped so you can add it manually.
- 4
4. Correct the misses with the manual tools
Now clean up the layout. The manual controls are the same set whether a field came from the scan or your own hand, which is what makes the scan-then-correct path so smooth. Move a field by dragging it onto its line, resize a box by pulling its handles until it matches the printed space, and duplicate a field when the form repeats the same input down a column, an initials line beside every clause, for instance. Delete anything wrong, and add new fields wherever the scan left a gap.
PDF Studio supports the field types real forms need: text, number, check or cross marks, date-style fields, and signature fields. Use the type that matches the blank so the finished document reads correctly. For styling, you have font, size, and color, plus exact position and dimensions. Stick to the PDF-safe fonts (Helvetica, Times Roman, and Courier) so the text renders the same way for whoever opens your export as it does on your screen.
This is also where the scan-first approach pays off even on awkward forms. Rather than starting from an empty page, you are editing a near-complete grid, so even a form the scan only half-understood is faster to finish than one built from scratch. If you would rather learn the manual tools in depth (precise alignment, consistent sizing across a form, styling choices), Placing and styling PDF fields by hand: text, numbers, checks, dates is the companion piece that picks up exactly here.
- Move, resize, duplicate, and delete fields; add manual ones for gaps.
- Match the field type to the blank: text, number, check/cross, date, signature.
- Style with Helvetica, Times Roman, or Courier for predictable exports.
- 5
5. Fill in the values
Once the boxes sit where they belong, filling them is the quick part, and doing it after the layout is stable means you are typing into fields you already trust. Work through the form in reading order so you do not skip a blank: names, addresses, identification numbers, amounts, dates, and any tick boxes that apply. Because the scan already positioned most fields, your eyes can stay on whether each answer is right rather than on whether the box is in the correct place.
Use the field type to your advantage. Number fields keep figures tidy, date-style fields keep dates consistent across the form, and check or cross marks make yes-or-no and select-all-that-apply questions unambiguous. If a value runs long and crowds its neighbor, that is a sizing issue you can fix on the spot by widening the field or dropping the font size a point, rather than cramming the text.
Take special care with the fields that carry weight: totals on an invoice, dates on an agreement, an account or reference number, and any field where a typo changes the meaning of the document. The scan can place a field perfectly and still, of course, know nothing about whether the number you typed into it is correct. That judgment is always yours.
- Fill in reading order so no blank gets skipped.
- Let number and date-style fields keep values consistent.
- Double-check high-stakes values: totals, dates, reference numbers.
- 6
6. Draw and place the signature
When the form needs a signature, use the signature tool to draw one, and replace it if the first attempt looks rough. A signature drawn with a trackpad rarely lands perfectly on the first try, so redrawing until it reads cleanly is normal and expected. Once you are happy with it, position it over the signature line the scan flagged, or over the spot you added by hand if the scan missed it.
Placement is where signatures go wrong most often. Size it so it sits on the line rather than floating above it or crashing into the printed name or date beside it. If the form has several signing points (an initial on each page plus a full signature at the end), place each one deliberately and check that none overlaps neighboring text. A signature that collides with a label looks careless on the finished PDF, and the recipient only ever sees that final result.
Keep in mind what the signature feature is: a way to sign a form visually inside the editor. The PDF Studio signature is a visual fill-and-sign mark, not a certificate-based digital signature. If your workflow requires a cryptographically verified signature, that is outside the current product. For the common case (a form that needs your visible signature to be considered complete), the draw-and-place tool does exactly the job.
- Draw the signature, and redraw it until it reads cleanly.
- Size and place it on the line without hitting nearby text.
- It is a visual fill-and-sign mark, not a certificate-based signature.
- 7
7. Review the layers, then download or print
Do one last pass before you export. Look at the page the way the recipient will and check the field layers together: nothing empty that should be filled, nothing duplicated by accident, no box sitting slightly off its line, and the signature placed cleanly. This review is what turns the scan from a time-saver into something you can actually send, because the scan gave you speed and this final look gives you confidence. Spending thirty seconds here is far cheaper than resending a form with a blank you missed.
When the visible result looks right, export the finished PDF: download the file or print it directly from the editor. Then open the downloaded copy on its own and give it a final glance before you send or submit it. Exporting and reviewing outside the editor confirms that what you saw in the workspace is exactly what everyone else will see. If anything is off, you still have your untouched original and your working session to fix it.
A closing reminder on scope so you are never surprised: the finished file is a completed, signed PDF and nothing more. PDF Studio does not compress it, convert it to another format, strip its metadata, or store it in a vault. You can read more about the tool boundaries at /how-it-works, and about how the browser-based editor handles your file at Privacy policy. The current job it does well is take a blank form and, with the scan doing the heavy lifting, get you to a clean finished document fast.
- Review every layer visually before exporting.
- Download or print, then open the exported copy to confirm it.
- The output is a finished PDF, with no compression or conversion.
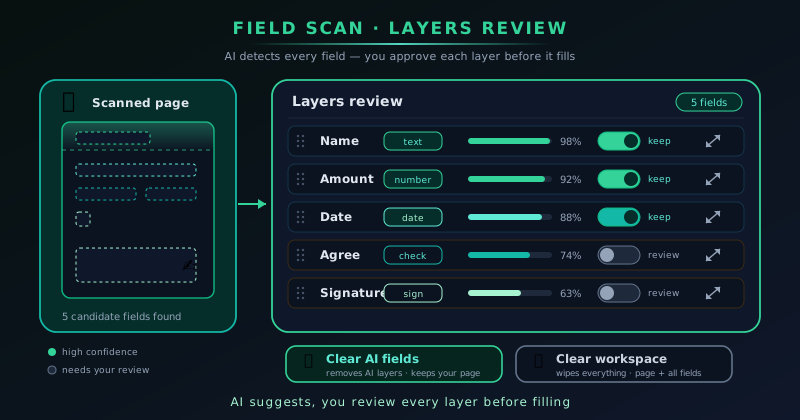
Let the scan build, but you approve
The AI field scan is fastest when you treat it as a first draft, not a finished form. Let it place the grid, delete anything it invented, add anything it missed, and read the whole page once before you type. The speed comes from the scan; the trust comes from your review. Keep the original file untouched and open the exported copy before sending, and a form that used to take twenty minutes of dragging boxes takes a couple.
Frequently asked questions
Quick answers to common questions about this topic.
What does the AI field scan actually detect?
It reads a structured PDF form and proposes editable fields where it expects inputs: text lines over blanks, boxes over tick spaces, date-style fields over dates, and a signature target. Every suggestion is an editable layer you can move, resize, restyle, or delete before exporting.
Can the scan read a scanned paper form or a photo?
Not reliably. The scan reasons about a form that is already digital and text-based. PDF Studio does not run OCR on scanned raster pages today, so a photographed or scanned paper form will need most fields placed by hand with the manual tools.
How do I remove a bad scan without losing my work?
Use the option to clear the AI-generated fields, which is separate from clearing the whole workspace. That wipes only the scan results and leaves your document and any manual fields intact, so you can rerun the scan or build the fields yourself.
Is the signature from PDF Studio a legally verified digital signature?
It is a visual fill-and-sign signature you draw and place in the editor, which is what most forms require. It is not a certificate-based digital signature, so a workflow needing cryptographic verification is outside the current product.
Related workflow
Any document to a signed, sendable PDF
A form that arrived as a scan, a DOCX or an image becomes a filled, signed PDF small enough to email, without a single upload to someone else’s server.
- Bring the source into PDFNovus Convert: Images, documents and ebooks all land as PDF here, so the editor downstream only ever sees one format.
- Fill the fields and signNovus PDF Studio: The AI field scan proposes the boxes; every one stays editable, because a form editor that cannot be corrected is worse than no editor.
- Compress before sendingNovus Convert: Adjustable quality with the measured output size shown before download, so there is no guessing whether it cleared the limit.
Related troubleshooting
Was this page helpful?
Your answer stays in this browser, it is not sent anywhere and no account or cookie is involved.